TL;DR

Get business pricing on tools and workshop supplies
- Business-only prices and quantity discounts
- Tax-exempt purchasing
- Multiple users, one account, clear invoices
To optimize your home storage solutions for construction tools, sort tools by type and frequency of use, then choose anchored wall storage, cabinets, labeled bins, and low shelves to suit their weight and care needs. Keep tools dry and dust controlled, store lithium-ion batteries according to manufacturer instructions, and leave exits and electrical panels clear.
Inventory tools by type, use frequency, weight, and care needs before buying storage.
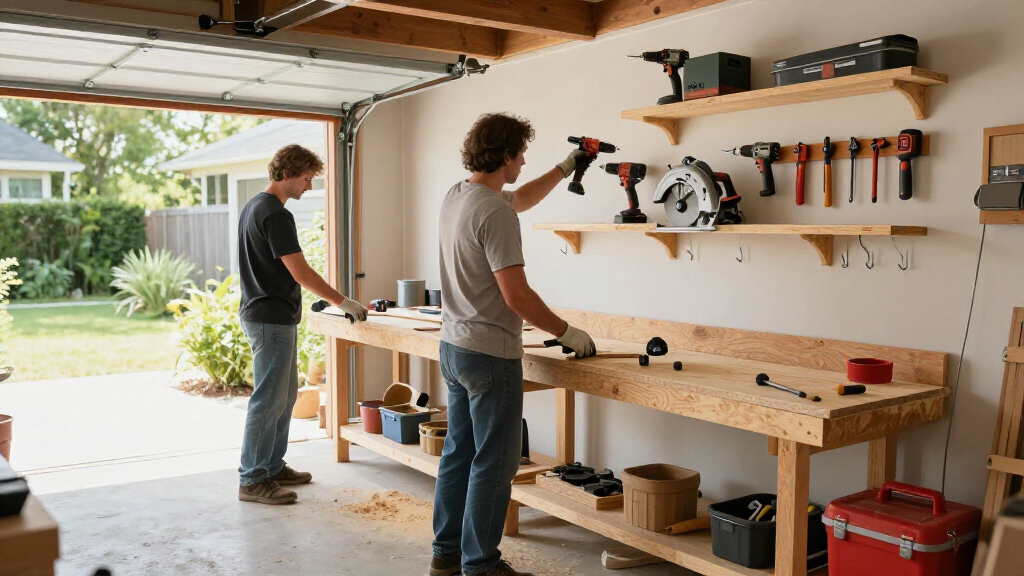
Use visible wall storage for appropriate light, frequent-use tools; anchor systems to suitable framing and keep heavy tools low.
Choose cases for transport, cabinets for dust protection, and labeled bins for accessories and fasteners.
Keep tools dry, clean off renovation dust, and follow manufacturer instructions for lithium-ion batteries and chargers.
Review your layout after projects and keep exits, electrical panels, and walkways clear.
Home workshop · Storage guide
How to Optimize Your Home Storage Solutions for Construction Tools
Build a tool area that keeps everyday gear easy to find, heavy equipment safely supported, and accessories protected from dust and moisture. Start with what you own, then fit storage to your space, climate, and routine.
Match each tool group to the right home
Frequency, weight, protection, and access all shape the best storage choice.
Wall rack or pegboard
Keep suitable hand tools and frequent-use gear visible. Mount into appropriate framing with hardware rated for the load.
Good for light, daily-use toolsCabinet or drawer
Protect tools from workshop dust and reduce visual clutter. Check shelf capacity and keep dense equipment low.
Good for protected storageLabeled bins & cases
Group bits, blades, fasteners, and accessories with the tools they serve. Specific labels make retrieval faster.
Good for parts and transportMake the label useful at a glance
Write “3-inch deck screws,” not “hardware.” Keep masonry bits beside the hammer drill and saw blades in a divider or case that covers sharp edges. Clear bins show contents; opaque containers can limit light and visual clutter.
A five-step reset for a storage system that lasts
Plan around your actual projects, then adjust the setup after you use it.
Inventory
Group hand tools, power tools, supplies, and protective equipment.
Prioritize
Mark frequent-use items, special care needs, and damaged or duplicate gear.
Measure
Note space, tool shape, approximate weight, and access to power.
Assign
Choose racks, cases, cabinets, and bins to suit each group.
Review
Return tools after projects and move items when a real bottleneck appears.
Safety and care belong in the layout
Good storage protects both the equipment and the people moving through the space.
Secure the space
- Anchor shelves and cabinets to suitable framing; confirm the system and hardware are rated for the load.
- Keep heavy tools low and stable. Store sharp tools securely and close drawers fully.
- Leave walkways, exits, and electrical panels clear.
- Keep tools, chemicals, and batteries out of reach of children and pets.
Protect tools and batteries
- Use dry, ventilated storage to help limit rust and corrosion.
- Clean renovation dust from tools; use cases or closed cabinets when practical.
- Follow the tool and battery manufacturers’ instructions for storage and charging.
- Avoid damaged batteries and unsuitable charging locations; allow suitable ventilation around chargers.
Balance access with protection
Use open storage where visibility helps. Add enclosure where dust, transport, or care needs matter.
Start with an inventory so your storage fits the tools you own
Start by sorting every tool into a few working groups: hand tools, power tools, fasteners and accessories, and protective equipment. Then mark what you reach for each week, what needs care, and what is broken, duplicated, or ready to donate. These details determine more than how much storage you need. Frequency tells you what deserves an easy-to-reach place; weight limits where it can go; and care needs tell you whether an open rack is suitable or a closed, dry case is worth the space. For example, a homeowner who repairs a fence each spring may need a cordless drill, driver bits, tape measure, level, and gloves close to the workbench. Putting those tools together cuts down on trips across the garage and makes it easier to notice when a bit or glove is missing. A tile saw used once every few years can live lower down or in a separate, protected area. Group accessories with the tool they serve: keep the masonry bits near the hammer drill, and blades near the saw, while keeping each in a case or divider that prevents sharp edges from snagging hands. The tradeoff is that dedicated groupings use more containers, but they also reduce rummaging and protect accessories from damage. Use a simple list or a quick phone photo of each group before you shop for storage. Note bulky shapes, approximate weight, and whether the tool needs a dry case or charger access. Those notes help you compare the storage you need with the space available, so you don’t solve a clutter problem by buying cabinets that block the walkway or shelves that cannot carry the load. Planning this way also makes damaged or missing items easier to spot when you put tools away after a project.Popular right now

Bose QuietComfort Wireless Bluetooth Headphones with Active Noise Cancellation, Mic, USB‑C Charging, Deep Bass, 24‑Hour Battery – White Smok

Vitamix Propel Series 510 Professional-Grade Blender, 3 Programs, Black

Dreame L50 Ultra Robot Vacuum and Mop
As an affiliate, we earn on qualifying purchases.
Put daily-use tools where you can grab them safely
Frequently used tools belong in visible, easy-to-reach storage, while occasional-use gear can go in closed cabinets or labeled bins. The practical benefit of visibility is speed: you can see both the tool and its assigned place, which makes retrieval easier and helps reveal when something has not been put back. The drawback is exposure to dust and accidental bumps, so open storage works best for durable tools used often and kept away from work that creates debris. A wall rack or pegboard can free up bench and floor space, but its strength depends on the panel, fasteners, wall framing, and load—not its appearance. Keep heavier tools low, and reserve overhead spots for lighter items you can lift without straining. Imagine a narrow garage where the car door nearly touches the workbench. A rail with hooks for a tape measure, hammer, and extension cord can clear the bench, while a low shelf holds the heavier circular saw in its case. That arrangement keeps common tools visible, protects the floor path, and avoids lifting the saw from shoulder height. If you mount a system to drywall, don’t assume drywall anchors can carry a loaded rack; attach it to suitable framing or use a mounting method rated for the actual load. A rack that looks sturdy but pulls loose can damage tools and injure someone, so the wall and hardware are part of the storage system too. A pegboard is useful for light hand tools and selected power tools when the board and hooks are rated for them and installed properly. For a heavy impact wrench or large demolition hammer, a cabinet shelf or tool chest often gives more stable support, though it uses floor space and may make individual tools less visible. In a rented home, check what wall changes are allowed and consider a freestanding rack that won’t compromise the wall. Whichever setup you choose, keep a clear route to the exit and electrical panel; storage should make the space work better, not block essential access.Choose a case, cabinet, or bin for each kind of gear
Use cases for tools that travel or need protection, cabinets and drawers for equipment you want shielded from dust, and labeled bins for small supplies. Each choice trades convenience against access and space. A case protects a tool and its accessories during transport, but a fitted case takes up more room than an open shelf. A cabinet limits dust and visual clutter, though you may need to open doors and drawers to find things. Bins make small parts easy to group, but a large, unlabeled tote can turn those parts into a single hard-to-search pile. Choosing by tool size and use beats putting everything into one large box. A practical system might keep a drill, charger, and common bits together in a case; put driver bits and screws into small divided bins; and store paint-covered hand tools in a cabinet with a wipeable shelf. Keeping the drill and its common bits together means fewer searches and lowers the chance that a project stops because a small accessory is missing. Clear bins make it easy to see what’s inside, but opaque bins can keep sunlight off contents or hide visual clutter. Either way, labels should say what’s in the container, not merely “garage.” For example, “3-inch deck screws” beats “hardware” when you’re halfway through a fence repair. Specific labels reduce the time spent opening containers and make it easier for other household members to return supplies correctly. For heavy or awkward equipment, check shelf capacity and stability before loading it. A low tool chest can hold dense tools safely, but drawers need a stable base and should close fully so nothing spills into a walking path. Portable stackable cases can make sense when you carry tools between home and a job site, though a stack is only convenient if the pieces you need aren’t buried at the bottom. Frequently used items may be better kept in a separate top case so access does not require unpacking the whole stack. Buy storage in stages: measure first, test the layout with existing boxes, then add pieces where a real bottleneck remains. This limits wasted space and avoids paying for capacity your collection does not need.Keep moisture and dust from shortening tool life
Store tools in a dry, ventilated area and keep dust from settling into moving parts, vents, and cases. Moisture encourages rust on steel, while fine renovation dust can clog a tool’s cooling openings or work its way into storage. Either problem can shorten tool life or cause trouble the next time you use the tool: a rusty cutting edge may perform poorly, and a blocked vent can make a motor overheat. A closed cabinet or case helps limit dust and damp air, but it can also trap moisture. Don’t seal damp equipment inside after a wet outdoor job; wipe it down and let it dry according to the manufacturer’s guidance first. A common example: after cutting pressure-treated lumber in a humid shed, a homeowner drops a circular saw and its blade into a closed plastic tote. The tote keeps more dust off the saw, but it also slows drying and holds humid air beside exposed steel. A faint rust film can then form even though the tool is out of the rain. A better routine is to brush off sawdust, wipe the tool, check the blade and cord, and return it to a dry case. In a basement or coastal garage where humidity lingers, a moisture meter or dehumidifier may help you understand the room; follow product instructions for any protective coatings you use. A dehumidifier can reduce dampness, but it adds cost and needs maintenance, so first notice whether condensation or rust is actually recurring. Dust control matters beyond tool life. Fine particles can move from a work area onto clean PPE or household items, so keep dusty sanding and cutting gear separate from them. Vacuum work surfaces with equipment suited to the dust rather than sweeping fine particles into the air. If your tools have filters, vents, or specific cleaning requirements, use the manual instead of blasting everything with compressed air; unsuitable cleaning can push debris deeper or damage components. Good storage starts after the work: a minute spent cleaning and drying a tool can spare you a rusty blade or a power tool that overheats on the next job.Make battery storage a dedicated, ventilated zone
Store and charge lithium-ion batteries according to the battery and tool manufacturers’ instructions, using the specified charger and a suitable location. Batteries contain stored energy, so heat, physical damage, or an unsuitable charging setup can create problems that ordinary hand tools do not. Keep batteries away from heat, moisture, and damage, and don’t charge a pack that is cracked, swollen, leaking, or otherwise damaged. A dedicated shelf or charging station can reduce cord clutter and help you notice a damaged pack, but it needs safe access to power and must not block an exit or sit where sparks, water, or combustible materials are likely. For instance, a homeowner who owns three cordless tools may be tempted to stack every battery and charger on the workbench beside paint thinner and rags. That saves setup space, but it leaves chargers crowded among materials that should be kept away from potential heat or sparks and makes it harder to inspect each pack. Instead, set aside a stable, ventilated area for the chargers, keep cords tidy, and store spare batteries as directed by their labels. Don’t improvise charging in a sealed cabinet or leave batteries in a hot vehicle; product guidance varies by model. A dedicated zone may take up a small amount of bench or shelf space, but it reduces cord tangles and makes the charging routine easier to check. Check the charger and battery manuals before setting temperature, charge level, or long-term storage practices, since those details differ. General advice can be a poor fit for a particular pack, so the product instructions should guide those choices. Keep damaged packs out of use and follow the manufacturer’s directions for service or disposal. If you have children or pets, place the charging zone where they cannot reach the batteries or pull cords down. A dedicated zone makes it easier to notice a damaged pack, find the right charger, and return everything to the same place after a job.Use this five-step reset to keep the system working
A storage plan only works if you can maintain it after a dusty Saturday project. Returning tools to their assigned places preserves the time saved by organizing them, while a quick inspection can catch damage before a tool is needed again. Use this five-step reset to return tools safely and spot small problems before they turn into a missing bit or damaged battery. The routine takes a few minutes and gives each tool a reliable home.- Clear the bench: move tools off the work surface and separate them by type.
- Inspect before storing: look for damage, loose blades, wet surfaces, or frayed cords.
- Clean and dry: remove sawdust and mud using the method the manufacturer recommends.
- Return tools to assigned spots: group accessories with the tool, and put heavy items back low.
- Check the room: keep the exit, electrical panel, and walking path clear; tidy charging cords.