TL;DR

Get business pricing on tools and workshop supplies
- Business-only prices and quantity discounts
- Tax-exempt purchasing
- Multiple users, one account, clear invoices
The best drywall repair tools depend on the size of the job. For small patches, simple hand tools and patches work well; for large repairs, powered tools and proper preparation are key. Using the right equipment saves time and ensures a smooth finish.
Imagine walking into a room with a giant hole in the wall, or a tiny dent that’s been bugging you for months. The tools you choose can turn a frustrating mess into a clean, professional finish—fast. Whether you’re patching a small hole from a picture hook or replacing a section of drywall after a leak, having the right gear makes all the difference. Drywall repair isn’t just about slapping on some mud; it’s about precision, control, and finishing that blends seamlessly into your wall.
In this guide, you’ll learn which tools are essential for small patches versus large repairs. I’ll share real-world examples, practical tips, and insights into new innovations that can save you time and effort. No matter if you’re a DIYer or a homeowner wanting a pro look, understanding your tools sets the foundation for success. Ready to get your hands dirty and your walls looking perfect? Let’s dive in.
Use small putty knives and self-adhesive patches for quick, neat small repairs.
Invest in power tools like drywall lifts and electric sanders for large, seamless repairs.
Modern innovations like cordless sanders and dust collection systems speed up finishing and keep your workspace cleaner.
Match your tools to the project size and your skill level to avoid frustration and subpar results.
Always wear safety gear—dust masks, goggles, gloves—and ventilate your workspace to protect your health.
FIELD GUIDE / HOME REPAIR
The Top Drywall Repair Tools for Small Patches and Large Repairs
The right gear turns a stubborn dent or a wall-sized repair into a smooth, professional finish. Match your tools to the area, prepare carefully, and work from clean cuts through careful finishing.
01 / SMALL PATCHES
Small tools. Precise control.
For nail holes, dents, and minor cracks, a compact hand-tool kit is affordable, easy to control, and often all you need.
Putty knives
A 3-inch knife gives control around tiny holes; a 6-inch knife spreads compound and feathers the repair into the wall.
Choose by patch sizeSelf-adhesive mesh
Mesh patches stick in place over small holes and provide a base for compound, reducing the steps needed for a quick repair.
Quick setupSanding sponge
Use light, even strokes to smooth ridges after the compound dries. A sponge or sanding block helps blend the patch into the wall.
Finish gently02 / LARGE REPAIRS
Support the panel. Speed the finish.
Replacing a section or repairing a large opening calls for accurate cuts, supported panels, and tools that cover more surface with less fatigue.
Drywall saw or utility knife
Make straight, precise edges so the replacement piece fits well and leaves fewer gaps to correct.
Drywall lift or panel hoist
Support heavy sheets during installation for better alignment and less physical strain, especially on ceilings.
Powered or pole sander
A variable-speed sander smooths broad surfaces faster. Dust collection helps capture airborne dust and reduce cleanup.
Wide taping knife set
A 10-inch knife helps embed tape and spread compound over larger seams in fewer, smoother passes.
03 / TOOL COMPARISON
Manual or powered?
Use the repair size, frequency, and finish expectations to decide whether to keep it simple or bring in powered equipment.
| Feature | Manual tools | Powered tools |
|---|---|---|
| Ease of use | Needs hand control and effort; approachable for small patches. | Less effort for large or repeated repairs. |
| Speed | Slower across broad surfaces. | ✓ Faster sanding and finishing over large areas. |
| Finish quality | Depends on technique and careful passes. | Consistent smoothing with speed control and practice. |
| Upfront cost | ✓ Lower; tools may already be on hand. | ~ Higher; renting can suit a one-off job. |
| Best suited to | Small patches, occasional repairs, beginners. | Large surfaces, frequent jobs, faster finishing. |
04 / NEWER OPTIONS
Cleaner, quicker, more accurate.
Modern tools reduce setup friction and make demanding jobs more manageable for homeowners and professionals.
Cordless sanders
Battery power makes it easier to reach ceilings and tight corners without managing a cord.
Dust collection
Compatible collection systems capture sanding dust at the tool and help keep the room cleaner.
Laser guides and digital levels
Guides help align panels and plan accurate cuts, reducing mistakes and rework.
Ergonomic and powered taping tools
Lightweight designs can improve comfort; powered options help speed up compound application on larger jobs.
05 / PICK YOUR KIT
Match the tools to the job.
Think about the damage, your experience, and how often you will use the equipment. A closet nail hole and a living-room wall opening call for different kits.
Size the damage
Small hole or dent? Start with hand tools. Large opening or panel replacement? Plan for cutting and support.
Cut and secure
Make clean edges and secure the patch or replacement panel before applying tape and compound.
Tape, mud, sand
Build smooth coats, allow them to dry, then sand lightly. Prime the finished repair before painting.
Buy or rent
Use basic hand tools for occasional fixes. Rent a lift or powered sander when the job is large or access is difficult.
What Are the Must-Have Tools for Small Drywall Patches?
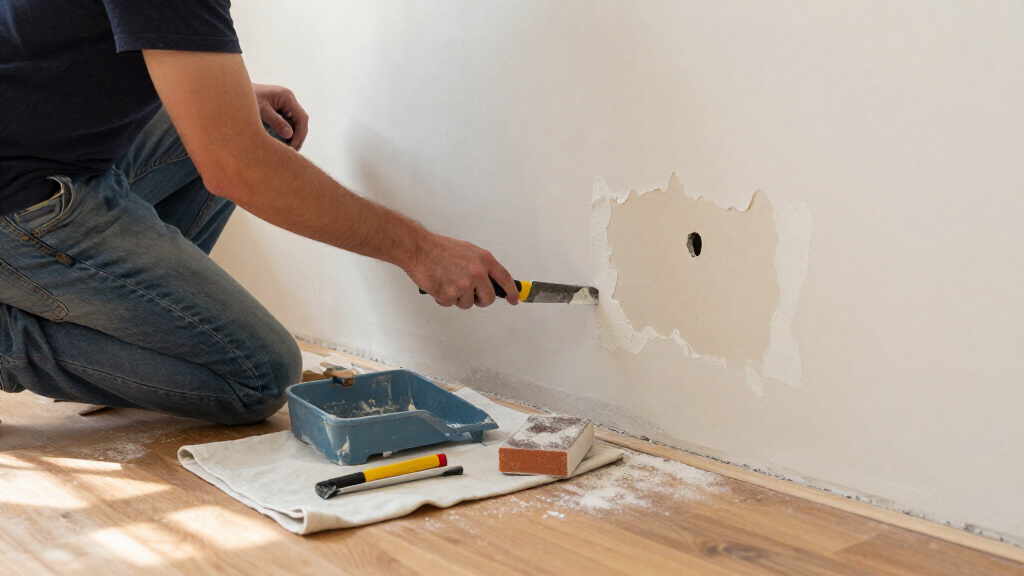
Small drywall patches are the bread and butter of DIY home repairs. They typically involve fixing nail holes, dents, or minor cracks. The key here is simplicity and control. You don’t need a full arsenal—just a handful of well-chosen tools.
Start with a set of putty knives. A 6-inch knife is perfect for applying joint compound smoothly. For tiny holes, a small 3-inch knife offers precision. These tools let you feather the mud around the patch, hiding the repair with ease.
Next, a high-quality drywall tape—either mesh or paper—helps embed the patch securely. For small repairs, self-adhesive patches with built-in mesh are a real time-saver. They stick instantly, reducing the need for multiple coats of mud.
Finally, a good sanding block or sponge is essential for feathering the finish. Light, even sanding smooths out ridges and blends the patch into the wall. For DIYers, these tools are affordable, easy to use, and produce professional results when used correctly.
Popular right now

Shark Navigator Lift-Away Upright Vacuum (NV360)

Dreame L50 Ultra Robot Vacuum and Mop

Bose QuietComfort Wireless Bluetooth Headphones with Active Noise Cancellation, Mic, USB‑C Charging, Deep Bass, 24‑Hour Battery – White Smok
As an affiliate, we earn on qualifying purchases.
The Essential Tools for Large Drywall Repairs That Look Professional
Large drywall repairs demand more robust tools and a strategic approach. When you’re patching a sizable hole or replacing a damaged section, you need equipment that handles bigger surfaces and thicker materials.
The first must-have is a drywall saw or utility knife. A sharp, fine-tooth saw allows you to cut clean, precise edges. This precision is crucial because uneven cuts can lead to gaps or mismatched seams, which compromise the repair’s appearance and durability. Clean cuts also reduce the amount of sanding needed afterward, saving time and minimizing dust.
Next, a drywall lift or panel hoist becomes invaluable. These tools support heavy sheets, reducing physical strain and ensuring perfect alignment during installation. Properly supported panels prevent sagging or misalignment, which can cause cracks or uneven surfaces over time. For example, in high-ceiling rooms, a lift helps you position large panels accurately without requiring multiple people or risking injury.
Power tools like a cordless drywall sander or pole sander with dust collection significantly cut finishing time. They allow you to smooth large surfaces efficiently, achieving a professional look without the fatigue of manual sanding. Dust collection systems also improve indoor air quality and reduce cleanup time.
Finally, a taping knife set, including a 10-inch knife, helps embed joint tape and apply mud in fewer coats. Larger repairs often involve multiple layers of mud, and having the right tools ensures each layer is smooth and well-adhered, decreasing the chances of future cracks or peeling. Investing in these tools means your large drywall repair will be more precise, faster, and ultimately more durable, mimicking a professional finish.
Comparison Table: Manual vs. Power Drywall Repair Tools
| Feature | Manual Tools | Powered Tools |
|---|---|---|
| Ease of Use | Requires physical effort and skill; better for small patches or occasional repairs. | Less effort, faster results; ideal for large or multiple repairs. |
| Speed | Slower, especially on large surfaces or extensive repairs. | Significantly faster; reduces sanding and mudding time. |
| Finish Quality | Depends on skill; can result in uneven surfaces if not careful. | Consistent, smooth finish, especially with variable-speed sanders. |
| Cost | Lower initial investment; tools are cheaper or often already owned. | Higher upfront cost; but saves labor and time. |
| Best For | Small patches, occasional repairs, DIY beginners. | Large projects, frequent repairs, professional results. |
Latest Innovations That Make Drywall Repairs Faster and Cleaner
Modern drywall tools are evolving rapidly, making repairs more efficient and less dusty. Cordless, battery-powered sanders let you reach high ceilings or tight corners without dragging cords or ladders. Imagine finishing a ceiling repair while standing comfortably on the floor—no more balancing on a ladder with a corded sander.
Self-adhesive patches and repair mesh are game-changers for small holes. They stick instantly, eliminating the need for multiple coats of mud and tape. This innovation simplifies the repair process, reduces material waste, and minimizes the skill required to achieve a smooth finish. For small holes, these patches allow you to skip steps like taping and multiple coats of mud, which can be time-consuming and tricky for DIYers.
Smart sanding tools with dust collection systems capture over 90% of airborne dust, keeping your workspace cleaner and healthier. These tools often feature variable speed settings, allowing you to control the finish quality on large surfaces. This means you can adjust the sander to produce a perfectly smooth surface with less effort and less cleanup.
Laser-guided levelers and digital tools improve accuracy during drywall installation, reducing mistakes and rework. They’re especially handy when aligning large panels or creating precise cuts for large repairs. These innovations add speed, safety, and quality to your drywall projects, making even complex repairs more manageable for DIYers and professionals alike.
How to Pick the Right Tools for Your Drywall Project
Choosing the right drywall tools boils down to understanding your project size, your skill level, and your budget. For small patches, stick with basic hand tools—putty knives, sanding sponges, and self-adhesive patches. They’re affordable, easy to control, and perfect for quick fixes.
For larger repairs, consider renting or investing in powered tools like drywall lifts, electric sanders, and taping knives. These speed up the process and improve finish quality, especially when working on bigger surfaces or multiple repairs. The right tools help you achieve a level of precision that manual tools might not match, especially in challenging spaces.
Think about the scope: a small hole in a closet wall? Hand tools will do, and you’ll likely get good results with minimal effort. A 3×3-foot hole in your living room? Power tools can drastically reduce your repair time and improve the consistency of the finish.
Assess your comfort with DIY tools. If you’re new, start with basic gear and practice on less visible areas before tackling major projects. If you plan to do multiple repairs or want a professional look, investing in quality powered equipment will pay off over time.
Finally, always prioritize safety. Wear dust masks, goggles, and gloves, especially when sanding or cutting drywall. Proper ventilation is key to avoiding dust inhalation. By matching your tools to your project’s scope, skill level, and safety considerations, you’ll improve your results and enjoy the process more.
Safety First: Protect Yourself During Drywall Repairs
Drywall repair involves dust, sharp tools, and sometimes heavy lifting. Safety should always come first. Always wear a dust mask or respirator when sanding or cutting drywall. The fine dust particles can irritate your lungs or cause long-term health issues if inhaled over time. Proper respiratory protection is essential, especially during extensive sanding or when working in poorly ventilated spaces.
Goggles or safety glasses are essential to protect your eyes from drywall debris or accidental splashes of joint compound. Safety glasses prevent injuries from flying particles and splashes that can cause irritation or vision issues. Gloves help prevent cuts from sharp drywall edges and protect your skin from chemicals in mud or primer. They also provide a better grip on tools, reducing accidents.
When using power tools, ensure they are in good working order and follow the manufacturer’s safety instructions. Keep cords out of your workspace to avoid tripping or accidental unplugging. Use clamps or supports to hold drywall panels steady during cutting or fastening, preventing slips that could cause injury.
Ventilate your workspace well. Open windows, use fans, or work outdoors if possible. Dust collection systems on power sanders are a huge help in minimizing airborne particles. Proper ventilation not only improves safety but also reduces the risk of dust accumulation, which can be a fire hazard or cause respiratory problems.
Remember, rushing or neglecting safety can lead to injuries or long-term health issues. Take your time, wear protective gear consistently, and keep your workspace tidy. A safe repair process results in a better quality outcome and keeps you healthy and injury-free.
Frequently Asked Questions
What tools do I need for a small drywall patch?
For small patches, you mainly need a set of putty knives, drywall tape or self-adhesive patches, joint compound, and a sanding sponge or block. These tools allow you to fill, embed, and smooth the repair with control and precision. Using these tools properly ensures your patch blends seamlessly into the wall, avoiding visible seams or bumps. The choice of tools affects the final appearance—cheap or improper tools can make a small repair look amateurish, while quality tools help achieve a professional finish even for beginners.
Which tools are essential for large drywall repairs?
Large repairs benefit from a drywall saw or utility knife, drywall lift or panel hoist, power sander or pole sander, and a good taping knife set. These tools help you cut cleanly, support heavy panels, and apply mud smoothly and efficiently. Proper tools reduce the physical strain and technical errors that can lead to uneven surfaces, cracks, or gaps. Investing in these tools not only speeds up the repair but also improves the durability and appearance of the finished wall, making it look almost indistinguishable from the original drywall.
Are there DIY-friendly drywall repair tools?
Yes, repair kits with pre-cut patches, self-adhesive mesh, and simple taping tools are designed for DIYers. They simplify the process by reducing steps like taping and multiple coats of mud, which can be challenging for beginners. These tools help achieve decent results with less experience, but understanding their proper use is key to avoiding issues like bubbling or uneven surfaces. They are especially useful for quick fixes or small repairs in visible areas where appearance matters.
What are the latest innovations in drywall tools?
Cordless sanders with dust collection, power-assisted taping knives, and laser-guided leveling systems are recent innovations. They significantly speed up repairs, improve finish quality, and enhance safety. For example, cordless sanders allow you to work comfortably on ceilings or high walls without cumbersome cords, while dust collection keeps your workspace clean and reduces health risks. Laser-guided tools improve precision during installation, reducing errors and rework. These innovations make drywall repair more accessible, efficient, and safer for DIYers and professionals alike.
How do I choose the right tools for my drywall project?
Assess the size of the repair, your skill level, and your budget. Small patches require basic hand tools like putty knives and sanding sponges, which are affordable and easy to control. Larger repairs benefit from powered tools such as drywall lifts, electric sanders, and taping knives, which speed up the process and improve results. Consider the scope: a small nail hole or crack can be fixed with minimal tools, but large holes or extensive damage demand more advanced equipment. Your comfort and experience with DIY tools matter—start with basic gear if you’re new, and gradually move to powered tools as you gain confidence. Always prioritize safety by wearing masks, goggles, and gloves, and ensure proper ventilation. Matching your tools to your project scope and skill level leads to better results, less frustration, and a more satisfying experience.
Conclusion
Choosing the right drywall tools transforms a tedious task into a straightforward process. For small patches, simple hand tools deliver clean results with minimal fuss. When tackling large repairs, powered equipment and smart innovations turn hours of work into a manageable project.
Remember, the secret isn’t just in the tools—it’s in matching them to your project and practicing safe work habits. With the right gear and a little patience, you can achieve a finish that looks just as good as a pro’s. So next time you face a drywall challenge, equip yourself wisely and get ready to see your wall transform.