TL;DR

Get business pricing on tools and workshop supplies
- Business-only prices and quantity discounts
- Tax-exempt purchasing
- Multiple users, one account, clear invoices
The best ways to improve drywall dust control during finishing are to apply smooth coats, sand only the spots that need it, capture dust at the tool, and seal the work area from occupied rooms. Dust-control compound and HEPA filtration add useful layers, but neither makes sanding dust-free; wear suitable eye and respiratory protection and clean with a HEPA-filtered vacuum or damp cloth.
A palm-sized ridge in a drywall joint can turn into a house-sized cleanup problem. Fine sanding dust slips under doors, settles on dark furniture, and hangs in the light like pale smoke.
The best ways to improve drywall dust control during finishing start before you switch on a sander: lay down smooth coats, close off the room, and collect dust as close to the tool as possible. You’ll also learn how to choose sanding methods, manage airflow, protect your lungs and eyes, and clean up without launching settled dust back into the air.
Even a small bedroom can coat a nearby hallway if you leave the door open and sand aggressively. A few deliberate steps can keep that powder near the joint where it belongs, protect people who are sensitive to airborne dust, and save you from wiping the same shelf three times.
Apply thin, even coats and follow the compound’s drying instructions to reduce ridges that need sanding.
Use light pressure and sand only marked high spots; connect larger sanding jobs to an extractor designed for fine dust.
Close off the work area, protect nearby surfaces, and manage HVAC airflow according to equipment guidance.
Use a suitable respirator and eye protection; check product labels and safety data sheets for the materials you’re sanding.
Let dust settle, then vacuum with appropriate HEPA filtration and damp-wipe surfaces instead of dry sweeping.
FIELD GUIDE / INTERIOR FINISHING
Best Ways to Improve Drywall Dust Control During Finishing
Keep fine gypsum and compound dust close to the joint: make smooth coats, sand only the high spots, capture debris at the tool, and contain the room before work begins.
At a glance
Dust control works best as a sequence, from a smoother finish to careful cleanup.
Reduce the work before sanding
Preparation lowers dust production and makes the remaining sanding more controlled.
Make each coat smooth
Use the widest practical knife for the finish coat, feather the edges, and let each layer dry as the product directs. Thin, even compound leaves fewer hard ridges to remove later. A damp center can clog abrasive; a thick patch can leave a stubborn high spot.
Choose materials with care
Dust-control compound can help more residue fall near the work instead of lingering airborne. It still makes fine dust, and drying or sanding behavior varies by product. Follow the label and treat it as one layer of control.
Mark the few high spots. Shine a work light across the seam, pencil in the ridges, then gently smooth only those areas after the compound is dry. Avoid sanding an entire joint to correct one edge.
Sand with control
Let the surface guide the tool. More pressure can damage drywall paper and create extra repair work.
Find the high spots
Use angled light and a light touch to locate ridges and tool marks.
Match tool to area
Use a fine-grit sponge for touch-ups; choose a pole or extractor-connected sander for broader work.
Keep the face flat
Make steady, gentle passes with suitable source extraction and a sealed connection.
Stop when smooth
Feel the joint and inspect under angled light before deciding whether more work is needed.
Build layers of protection
Containment blocks migration; source capture and filtration address dust in the work zone.
Control roles, not measured performance. Results depend on equipment, setup, product, and conditions.
Seal the room: close doors, cover floors and furniture, and tape obvious gaps leading to occupied spaces.
Mind HVAC airflow: check manufacturer guidance before covering vents or changing system operation.
Filter escaped dust: size a HEPA air cleaner for the room and keep its intake and exhaust unobstructed.
Check extraction: use the sander maker’s recommended filter and bag; a standard shop vacuum may not retain fine particles.
Protect people, then clean carefully
Personal protection and a low-disturbance cleanup complete the dust-control plan.
Eyes and lungs
Wear eye protection and a properly fitted particulate respirator suitable for the task and product, especially during prolonged sanding or in a poorly ventilated space. Follow respirator instructions, product labels, safety data sheets, and applicable workplace requirements.
Let dust settle first
Then vacuum with appropriate HEPA filtration and damp-wipe surfaces where suitable. Avoid dry sweeping and compressed air, which can put settled dust back into the air. Dispose of collected dust and coverings carefully.
Make each coat smooth so you have less to sand
The best ways to improve drywall dust control during finishing start with applying compound evenly, because every ridge you leave behind becomes a sanding job. A smooth finish coat cuts down on sanding time, airborne residue, and the risk of scuffing the drywall paper.
Use the widest practical knife for your final coat and feather the edges so the joint blends into the wall. Let each layer dry for the time stated on the product label; a damp center can gum up your abrasive, while an overly thick patch often leaves a hard ridge. Think of compound like cake frosting: a thin, even layer takes less work to smooth than a tall lump.
For example, if a seam catches a bright work light, mark the few high spots with a pencil and shave those down gently after the compound dries. Don’t sand the whole seam just because one edge needs attention. That small habit protects the paper face and keeps fine gypsum and compound dust during finishing close to the repair instead of across the room.
Dust-control joint compound can help because more residue tends to fall near the work rather than float away. It still creates dust, and drying time and sanding behavior can differ by product, so follow its instructions. Treat it as one helpful layer, not a substitute for a sealed work area or a respirator.
Popular right now

Roborock F25 GT Set Cordless Wet Dry Vacuum Cleaner and Mop with 2 Brushes

Roborock F25 BX Cordless Wet Dry Vacuum Mop

Roborock F25 Ultra Steam Wet Dry Vacuum Mop
As an affiliate, we earn on qualifying purchases.
Sand only the high spots and capture dust at the tool
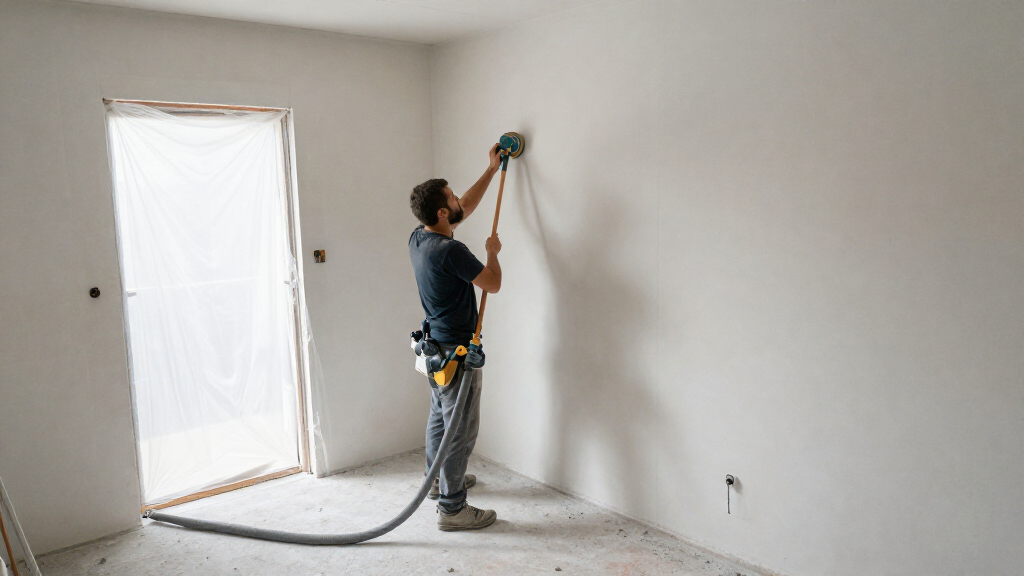
To sand drywall with less dust, remove only the ridges and tool marks you can see or feel, then capture residue at the sanding surface. A compatible sander connected to a suitable dust extractor can collect debris before it spreads, while light pressure helps prevent gouges that need another coat.
- Check the surface: Shine a work light across the joint and mark high spots.
- Choose the tool: Use a fine-grit sponge for a small touch-up, or a pole sander or extractor-connected sander for broader areas.
- Sand gently: Keep the sanding face flat and use steady, light passes; stop once the ridge is gone.
- Inspect again: Feel the joint and check it under angled light before moving on.
Picture a 12-foot bedroom seam with two small ridges. A few controlled passes over those ridges can finish the job; bearing down on the entire seam can tear the paper and add repair work. More pressure does not automatically mean faster progress.
Dust capture depends on a good connection, a clean filter, and equipment designed for fine dust. A standard shop vacuum may pick up visible debris but can release fine particles if its filtration or bag is unsuitable. Check the vacuum and sander instructions, use the recommended filter and collection bag, and rent a proper extractor if a larger job demands more runtime or capacity than your DIY setup can handle.
Seal the room before dust can reach the hallway
Containment keeps sanding dust from traveling beyond the room, so close doors, cover nearby surfaces, and seal gaps that connect the work area to occupied spaces. Barriers prevent migration at the source; trying to vacuum dust off every surface after it spreads takes longer and reaches less.
Cover floors and furniture with plastic sheeting, then tape the edges where dust could escape. Close interior doors and seal obvious gaps around them with painter’s tape and plastic as needed. If you’re working in a bedroom beside a living room, protect the doorway and move loose belongings before sanding starts; a dusty blanket or stack of books is much harder to clean than an empty corner.
Pay attention to HVAC openings in the work area. A running system can draw fine dust toward a return and carry it to other rooms, while a supply vent can blow it across the joint. Follow the equipment manufacturer’s guidance before covering vents or changing system operation, and restore the system afterward. Don’t block equipment in a way that could cause damage or create a safety issue.
For a small patch, a closed door and floor covering may be enough. A whole-room finish or several adjoining rooms need tighter barriers and more planning. Dust behaves like flour shaken over a counter: the farther you let air carry it, the more surfaces you’ll have to wipe.
Move air toward filtration instead of into clean rooms
Use ventilation and filtration to remove airborne dust from the work zone without pushing it into clean rooms. A fan exhausting outdoors can help when conditions allow, and a properly sized HEPA air cleaner can capture particles that escape the sander.
Airflow has a direction, just like water running downhill. If a fan blows from the dusty room toward an open hall, it carries particles along with it; position exhaust so air moves away from clean areas. Keep barriers in place while the fan runs, and check that the exhaust route does not send dust toward a neighbor’s window, a walkway, or an air intake.
A portable HEPA air cleaner works best as an added layer with enough capacity for the room and an unobstructed path for air to pass through it. Put it near the work area without placing it where its intake or exhaust disrupts containment. For example, in a small office, a running cleaner may catch floating residue after sanding, but it will not stop dust that already settled on a desk outside the doorway.
Source capture remains the first choice: a dust-extracting sander gathers debris as you work, while an air cleaner handles what escapes. Keep filters clean and replace them as the manufacturer directs. A clogged filter or poorly sealed connection can reduce performance, even when the label says HEPA.
Protect your eyes and lungs while you work
Wear eye protection and a properly fitted particulate respirator during sanding, especially for prolonged work or in a poorly ventilated space. A respirator only protects you when it suits the task, fits your face, and is used according to its instructions.
Drywall dust can irritate the eyes, skin, and respiratory system, and the exact exposure depends on how much dust the work creates and how long you breathe it. Read the product label and safety data sheet, since joint compounds may contain additional ingredients. Don’t assume a simple dust mask covers every task or material.
For example, someone sanding one small patch in a closed, protected room has a different exposure than a crew sanding a full floor of rooms throughout the day. Both should control dust and protect themselves, but a longer job calls for careful attention to respirator fit, breaks, filtration, and workplace requirements. If your work falls under workplace rules, follow the applicable requirements for respirator selection and use.
Dust control matters even more when children, older adults, or people with respiratory sensitivities are nearby. Keep them out of the work area and avoid letting dust drift into rooms they use. If the work involves electrical, gas, structural, or roof changes, bring in a licensed professional and follow applicable permits and code requirements; finishing a wall does not make hidden building work safe to improvise.
Clean settled dust without sending it airborne again
Let airborne dust settle, then use a vacuum with suitable HEPA filtration and damp wiping where the surface allows. Dry sweeping and compressed air kick settled particles back into the air, undoing the containment and capture work you’ve already done.
Wait until the haze has cleared before cleanup. Vacuum the floor, ledges, and covered surfaces slowly, using attachments suited to the material; then wipe remaining residue with a damp cloth. If you can still see a powdery film on a dark shelf, change the cloth or rinse it rather than dragging dust across the surface.
For a small repair, careful damp wiping may handle the immediate area. After sanding a whole room, vacuum first so you don’t turn a thick layer of powder into dirty paste on the floor. Remove used plastic carefully by folding dusty sides inward, and bag collected debris according to local disposal rules.
Check the vacuum’s filter and bag instructions before collecting fine drywall dust. A machine can sound powerful and still blow fine particles back out if it lacks suitable filtration or has a poor seal. When you finish, inspect the doorway and nearby rooms; if dust has escaped, vacuum and damp-wipe those surfaces rather than sweeping them clean.
Frequently Asked Questions
Does dust-control joint compound eliminate drywall dust?
No. Dust-control compound can make more sanding residue fall near the work area, but sanding still produces fine particles. Use containment, source capture, and suitable eye and respiratory protection.
What is the best way to sand drywall with less dust?
Sand only the spots that need correction, use light pressure, and connect a compatible sander to an extractor designed for fine dust when practical. Close off the room and wear protection suited to the task.
Can I use a regular shop vacuum for drywall dust?
A regular shop vacuum may collect larger debris, but its filter and seals may not handle fine drywall dust well. Check the manufacturer’s instructions and use suitable filtration and collection bags; rent a dust extractor for a larger finishing job if your equipment is not designed for fine dust.
Is wet-sanding drywall a good way to control dust?
A damp sponge can smooth small imperfections with little airborne dust, so it works well for touch-ups. It takes longer on large areas and can leave an uneven surface if you overwork the compound.
How do I keep dust out of the rest of the house?
Close the work area off with barriers, cover nearby surfaces, and manage airflow so it does not carry dust into clean rooms. Capture dust at the sander and clean with suitable vacuum filtration or damp cloths.
When should I clean up after sanding?
Wait for airborne dust to settle, then vacuum with suitable HEPA filtration and damp-wipe surfaces where appropriate. Avoid dry sweeping or compressed air, which can put settled particles back into the air.
Conclusion
Keep drywall dust close to the joint by making smooth coats, sanding lightly, and collecting debris at the tool. Seal the room, wear suitable protection, and clean with filtration or damp methods.
Do that, and the finishing dust stays a small pale patch by the wall instead of a fine gray coat on every shelf in the house.