TL;DR

Get business pricing on tools and workshop supplies
- Business-only prices and quantity discounts
- Tax-exempt purchasing
- Multiple users, one account, clear invoices
You can finish drywall to paint-ready smoothness with five core tools: a 4–6 inch taping knife, a 10–12 inch finishing knife, a mud pan, joint tape, and a pole sander with 120–150 grit abrasive. Thin coats applied with progressively wider knives, inspected under a raking work light, matter more than expensive equipment.
The most expensive knife in the store will not save a bad taping job. I’ve watched first-timers drop $200 on tools and still end up with seams that telegraph through the paint six months later. Meanwhile, a retiree with a $15 knife, a plastic mud pan, and patience can lay down a wall that looks factory-flat.
The difference isn’t the gear. It’s knowing which tools do which job, and — more importantly — how technique changes from one coat to the next. Essential drywall finishing is a sequence: embed tape, build coats, feather edges, sand lightly, inspect. Each stage asks something different from your hands.
In this guide, I’ll walk you through every tool that earns its spot in the bucket, what you can rent instead of buy, and the finishing order that produces a smooth finish you’ll be proud to roll paint onto. I’ll also flag the safety gear that’s non-negotiable, because drywall dust is not something to breathe casually.
Five core tools cover nearly every drywall finishing job: a 4–6 inch taping knife, a 10–12 inch finishing knife, a stainless mud pan, paper joint tape, and a p…
Switch to a wider knife with each coat — the progression from narrow to wide is what feathers joint compound edges into the wall instead of building ridges.
Use mesh tape only with setting-type compound for the first coat; use paper tape for seams and all inside corners.
Inspect every coat with a raking work light held at a shallow angle — overhead light hides flaws that eggshell paint will expose later.
Rent a vacuum-assisted sander for whole-room jobs; buy the hand tools. Apply compound in thin coats and let each one dry fully before the next.
Essential Drywall Finishing Tools for Achieving a Smooth Finish
Five core tools take drywall to paint-ready smoothness — and technique beats price every time. Thin coats applied with progressively wider knives, inspected under raking light, matter far more than expensive equipment. A retiree with a $15 knife and patience can out-finish a first-timer with $200 of gear.
nearly every job
toolkit cost
one heavy one
The 5 Tools That Do 90% of the Work
Everything else is a convenience. Master these five and you can handle seams, corners, fastener spots, and patches in a typical room — well under $100 total.
4–6" Taping Knife
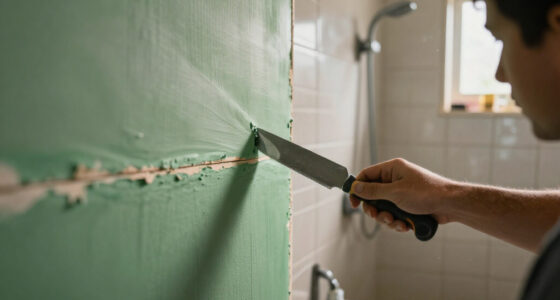
Your precision tool: bedding tape, filling fastener heads, and tight spots around outlets and patch edges. A flexible blade flexes with the wall instead of digging in.
10–12" Finishing Knife
Where coats two and three happen. The wide blade bridges low spots and tapers compound edges into the wall. You cannot fake a wide feather with a 6-inch knife — you’ll just build a ridge.
Stainless Mud Pan
Holds compound at your side with a clean edge to wipe the knife against. Dried crumbs in a dirty pan are the number-one cause of comet-tail scratches under paint. Rinse between coats.
Joint Tape
Paper or fiberglass mesh reinforces every seam. Paper for flat seams and all inside corners; mesh only with setting-type compound for the first coat — or the joint can crack months later.
Pole Sander + Screen
120–150 grit screen on a hand or pole sander knocks down ridges and tool marks. Light passes only — over-sanding exposes tape and paper face, requiring repair.
Raking Work Light
A bright light held at a shallow angle reveals ridges, dents, and tool marks that overhead lighting hides — the reason pros inspect every coat before moving on. Eggshell paint won’t forgive.
Paper Tape vs. Mesh Tape: Which One Won’t Crack
Mesh goes on sticky-side-down with no bed coat, so beginners love it. But bury mesh in regular premixed mud and the joint can crack along the seam months later — every seam in one mesh-taped ceiling I opened had a hairline crack you could slide a business card into.
| Feature | Paper Tape | Fiberglass Mesh |
|---|---|---|
| Best use | ✓ Flat seams, inside corners | ~ Repairs, small patches, flat seams |
| Application | Embedded in a bed of compound | Self-adhesive, sticks to dry surface |
| Required compound | ✓ Any joint compound | ✗ Setting-type for first coat |
| Strength | ✓ Higher — resists cracking | ✗ Lower without setting compound |
| Corners | ✓ Yes — folds cleanly | ✗ No — not for corners |
The Finishing Order That Produces a Smooth Finish
Apply thin coats with progressively wider knives, let each dry fully, and sand only at the end. Skip a stage or rush a dry time and you pay for it under paint. Narrow knife to wide knife, thin coat after thin coat — that’s the whole secret.
Prepare
Scrape loose paper and crumbs, vacuum, and check screws — set slightly below the face, never breaking it.
Scraper · VacuumTape Joints
Bed of compound, press tape in, squeeze out mud and air. Cut out bubbles now, not later.
4–6" KnifeFill
Two thin passes over every screw head; folded paper crease for each inside corner.
6" KnifeFill Coat
Thin coat extending 1–2" past the tape edges. Hold the blade flatter near the end of each pass.
8–10" KnifeFinish Coat
Thin coat, wide feather, edges tapering to nothing. Let it dry completely.
10–12" KnifeSand & Inspect
Light 120–150 grit passes, then drag a work light across the wall at a shallow angle and hunt shadows.
Pole Sander · LightPrime
Primer evens absorbency so the topcoat doesn’t flash — and flaws jump out while you can still fix them.
Primer · RollerBuy the Hand Tools, Rent the Big Ones
Three thin coats beat one heavy one every single time — thick coats shrink, crack, and take forever to dry. Here’s how the workflow effort and cost actually distribute.
Dust Control: Protect Your Lungs (and Your Marriage)
Sanding drywall produces fine gypsum dust that gets into everything — HVAC systems, electronics, coffee makers, and your lungs. Seal the room before you sand, not after.
Vacuum-Assisted Sander
- Rent for $40–60/day — captures a large share of dust at the source
- It does not capture everything — you still wear the respirator
- Genuinely worth it for full rooms and ceilings
- Most home centers stock them for daily rental
Seal, Tape, Vent
- N95 respirator minimum, safety glasses, drop cloths
- Plastic over doorways with a zipper flap
- Tape off supply and return vents especially — they pull dust into ductwork
- Single patch: hand sander + box fan blowing out a window is honestly fine
What to Remember Before You Open the Mud
Five tools cover it: 4–6" taping knife, 10–12" finishing knife, stainless mud pan, paper joint tape, and a pole sander with 120–150 grit abrasive.
Go wider each coat. The narrow-to-wide progression is what feathers edges into the wall instead of building ridges.
Tape rules: mesh only with setting-type compound for the first coat; paper tape for seams and all inside corners.
Inspect with raking light on every coat — overhead light hides flaws that eggshell paint will expose six months later.
Rent the sander, buy the hand tools. Thin coats, fully dry between passes, sand lightly at the end only.
Prime before painting. Drywall primer evens absorbency so the topcoat doesn’t flash — and reveals what’s left to fix.
The 5 Tools That Do 90% of the Work
Essential drywall finishing comes down to five tools: a 4–6 inch taping knife, a 10–12 inch finishing knife, a mud pan, joint tape, and a sanding setup. Everything else is a convenience. Master these and you can handle seams, corners, fastener spots, and patches in a typical room.
The 4–6 inch knife is your detail tool. You use it for bedding tape, filling fastener heads, and working tight spots around outlets and patch edges. A flexible blade here is easier to control — it flexes with the wall instead of digging in.
The 10–12 inch knife is where the magic happens on coat two and three. A wider blade bridges low spots and feathers compound out so the edge tapers into the wall. You cannot fake a wide feather with a 6-inch knife; you’ll just build a ridge with a small footprint.
The mud pan sounds trivial until you use one. It holds compound at your side and gives you a clean edge to wipe the knife against. A dirty pan with dried crumbs in it is the number-one cause of those little comet-tail scratches you find after the paint goes on. Rinse it between coats.
Joint tape — paper or fiberglass mesh — reinforces every seam. And a hand sander or pole sander with 120–150 grit screen knocks down ridges at the end. That’s the kit. Total cost for decent DIY-grade versions: well under $100.
Popular right now

KitchenAid Classic Series 4.5 Quart Tilt-Head Stand Mixer K45SS, Onyx Black

Ninja Specialty Coffee Maker CM401, 10-Cup Carafe, Fold-Away Frother, Black

Bose QuietComfort True Wireless Earbuds with Active Noise Cancellation, Black
As an affiliate, we earn on qualifying purchases.
Paper Tape vs. Mesh Tape: Which One Won’t Crack
Paper tape is the standard for flat seams and inside corners because it’s stronger and stays put when properly embedded in joint compound. Fiberglass mesh tape is self-adhesive and faster to place, but it flexes — which is why it should be paired with setting-type compound for the first coat, not standard premixed mud.
Here’s the tradeoff in plain terms. Mesh goes on sticky-side-down with no bed coat, so beginners love it. But if you bury mesh in regular drying-type compound, the joint can crack along the seam months later. I’ve opened up repairs where someone mesh-taped an entire ceiling with all-purpose premix — every seam had a hairline crack you could slide a business card into.
| Feature | Paper Tape | Fiberglass Mesh |
|---|---|---|
| Best use | Flat seams, inside corners | Repairs, small patches, flat seams |
| Application | Embedded in a bed of compound | Self-adhesive, sticks to dry surface |
| Required compound | Any joint compound | Setting-type for first coat |
| Strength | Higher — resists cracking | Lower without setting compound |
| Corners | Yes — folds cleanly | No — not for corners |
My advice for a whole room: paper tape. Save mesh for the small stuff where its convenience actually pays off.
The Finishing Order That Produces a Smooth Finish
A smooth drywall finish comes from applying joint compound in thin coats with progressively wider knives, letting each coat dry fully, and sanding only at the end. Skip a stage or rush a dry time and you pay for it later under paint.
- Prepare the surface. Scrape off loose paper and compound crumbs, vacuum dust, and check every screw. Screws should sit slightly below the paper face without breaking it. A broken face loses holding strength — drive a second screw next to it if you tore one.
- Tape the joints. Spread a bed of compound over the seam, press the tape in with your knife, and squeeze out excess mud and air. Bubbles under tape are the classic first-timer failure — if you see a bulge, cut it out now, not later.
- Fill fasteners and corners. Two thin passes over every screw head, and a folded paper tape crease for each inside corner. An inside-corner knife speeds this up, but plenty of finishers just use their 6-inch knife for better control.
- Apply the fill coat. Switch to the 8–10 inch knife. Spread a thin coat that extends an inch or two past the tape coat’s edges. Feather by holding the blade flatter near the end of each pass.
- Apply the finish coat. The 10–12 inch knife now. Thin coat, wide feather, edges tapering to nothing. Let it dry completely.
- Sand and inspect. Light passes with 120–150 grit, just enough to erase ridges and tool marks. Then — this is the part everyone skips — drag a work light across the wall at a shallow angle and look for shadows.
- Prime before painting. Drywall primer evens out absorbency so the topcoat doesn’t flash, and it makes any remaining flaw jump out while you can still fix it.
That progression — narrow knife to wide knife, thin coat after thin coat — is the whole secret. Thick coats shrink, crack, and take forever to dry. Three thin coats beat one heavy one every single time.
Dust Control: The Gear That Protects Your Lungs (and Your Marriage)
Sanding drywall produces fine gypsum dust that gets into everything — HVAC systems, electronics, coffee makers, and your lungs. You need at minimum a well-fitted dust mask or respirator (N95 minimum), safety glasses, and drop cloths sealing off the work area.
Here’s the honest breakdown. A vacuum-assisted pole sander captures a large share of the dust at the source and is genuinely worth renting for a whole-room job — most home centers rent them for $40–60 a day. It does not capture everything, so you still wear the respirator. For a single patch, a hand sander with a sanding screen and a box fan blowing out a window is honestly fine.
Seal the room before you sand, not after. Plastic over doorways with a zipper flap, and tape off supply vents — return vents especially, because they pull dust straight into your ductwork.
I once finished a basement and skipped taping one return vent. Two floors up, the family found white film on every horizontal surface in the kitchen. That lesson cost me a detailing bill and a chunk of pride. Budget twenty minutes for containment; it saves hours of cleanup.
Also: wet-sanding is an option for tiny touch-ups. A damp sponge smears down small ridges with near-zero dust, but it’s slow and can leave a soft, fuzzy surface if you overwork it. Fine for a patch, miserable for a wall.
The $15 Tool That Finds Every Flaw: Why You Need a Raking Light
A bright work light held at a shallow angle across the wall reveals ridges, dents, and tool marks that ordinary overhead lighting completely hides. It’s the cheapest quality-control tool in the building, and most DIYers never pick one up.
The physics are simple. Overhead light hits the wall head-on, so a 1/32-inch ridge barely casts a shadow. Tilt a bright LED almost parallel to the surface and that same ridge throws a shadow line a quarter inch long. Suddenly you can see every knife mark, every pinhole, every spot where your feather didn’t quite taper.
Use it twice. First, after your finish coat dries and before sanding — mark flaws with a pencil (never a pen or marker; graphite won’t bleed through paint). Second, after priming. Primer changes the surface’s reflectivity, and it will expose flaws the raw compound hid.
This is exactly why seams sometimes show after painting and homeowners swear the wall looked perfect before. It didn’t. The lighting changed. That gleaming eggshell topcoat in the afternoon sun is the harshest raking light there is — better to find your flaws with a $15 clamp light than on move-in day.
Any bright, handheld LED work light works. Clamp it to a ladder or have someone hold it low against the wall while you work your way across the surface. Mark, spot-fill, lightly sand, and recheck.
Buy, Rent, or Skip: Honest Advice on the Fancy Stuff
Buy the hand tools, rent the powered sanders for big jobs, and skip the specialty gadgets until you know you need them. That’s the whole decision tree for tools for achieving a smooth finish without wasting money.
Buy: knives (4–6 inch and 10–12 inch), stainless mud pan, paper tape, sanding screens, pole sander head, and the work light. Combined, roughly $80–120 for DIY-grade that will last several rooms. Buy stainless steel pans and knives if you can — carbon steel rusts, and rust streaks end up in your compound.
Rent: a vacuum-assisted drywall sander for anything bigger than one room’s worth of seams. Also consider renting a drill-mounted mixing paddle setup if you’re opening multiple buckets of compound — though honestly, a stout mixing paddle attached to a decent drill is a $25 buy that gets used forever.
Skip (for now): automatic taping tools, corner boxes, and banjos. A banjo — the tool that applies tape and mud in one pass — costs several hundred dollars and has a real learning curve. Inside-corner knives run $15–30 and are worth trying, but many pros still prefer a standard knife for control.
On compound choice: all-purpose premixed handles most of what a homeowner touches. Setting-type compound (the powdered kind that hardens chemically in 20–90 minutes) shines for repairs and fast turnarounds, but it sets on a schedule whether you’re ready or not — and once it hardens in your pan, that pan is a doorstop. Lightweight premixed compounds sand easier but check the label; products genuinely vary.
Frequently Asked Questions
What drywall finishing tools does a beginner actually need?
A 4–6 inch taping knife, a 10–12 inch finishing knife, a stainless mud pan, paper joint tape, a sanding pole with 120–150 grit screens, a bright work light, and dust protection (N95 mask, safety glasses, drop cloths). That kit costs under $120 and handles seams, corners, fasteners, and patches in a typical room. Skip automatic taping tools until you’ve finished a few rooms by hand.
What grit sandpaper should I use on drywall?
Most finishers start around 120–150 grit drywall sanding screens or paper for smoothing, then step to a finer abrasive for touch-ups. Use light pressure — sanding through the compound exposes the tape or the drywall paper face, and both require repair. Always follow the abrasive manufacturer’s guidance, and check your progress with a raking light rather than sanding blind.
Should I sand between every coat of joint compound?
Only lightly, and only if needed. A quick scrape or light sanding pass to knock down ridges before the next coat is normal; aggressive sanding between coats is not. Inspect each dried coat under a raking light, knock down any high spots, then apply the next thin coat with a wider knife. Save the real sanding for after the finish coat.
How long does joint compound take to dry before sanding?
There’s no single number. Premixed compound must dry evaporatively — temperature, humidity, ventilation, and coat thickness all matter, and a 24-hour window is common for thick coats. Setting-type compound hardens chemically on the schedule printed on the bag (often 20–90 minutes) and can be recoated sooner. Always follow the product label rather than the calendar.
Why do my drywall seams show through the paint?
The usual causes: insufficient feathering, uneven compound thickness, sanding through the surface, or paint sheen revealing a shallow ridge that normal lighting hid. Fix it by raking a bright light across the wall, marking the ridges, applying a wide, thin coat with a 10–12 inch knife to feather the edges, and sanding lightly after it dries. Prime before repainting so absorbency differences don’t flash.
How do I reduce drywall sanding dust in my house?
Seal the room with plastic and zipper doorways, tape off supply and return vents, use a vacuum-assisted pole sander for large areas, and run ventilation. Wear a well-fitted N95 or better respirator and safety glasses regardless — no dust-control system captures everything. For small patches, wet-sanding with a damp sponge produces almost no dust.
Conclusion
Here’s the takeaway I’d give a friend holding a bucket of mud for the first time: the tools are simple, the technique is sequential, and the light tells the truth. Thin coats, wider knives each pass, sand lightly, and check everything with a raking light before primer touches that wall.
You don’t need a pro’s arsenal — you need clean pans, sharp eyes, and the patience to let coat two dry before you rush coat three. Do that, and when the paint rolls on and the afternoon sun rakes across that wall, you’ll be the only one who knows where the seams are. Because you marked them with a pencil.