TL;DR

Get business pricing on tools and workshop supplies
- Business-only prices and quantity discounts
- Tax-exempt purchasing
- Multiple users, one account, clear invoices
Most heavy lifting accidents on residential projects come down to four preventable failures: power line contact, soft ground under outriggers, bad rigging, and people standing under suspended loads. Keep at least 10 feet from lines up to 50kV, verify ground bearing capacity before setup, inspect every sling and shackle before each lift, and never let anyone — including you — work beneath a load. If the lift exceeds your training or your homeowner-grade equipment, hire a certified operator.
A homeowner rents a 20-ton crane to set three glulam beams over his new great room. Total rental cost: $900 for half a day. Total cost of the beam that clipped his service drop, shut power to the block, and triggered a utility claim: north of $12,000. That story plays out every week during building season, and almost none of it is bad luck. It’s skipped planning [1].
Here’s the uncomfortable truth from someone who ran renovation crews for two decades: residential lifting is more dangerous per lift than commercial lifting, not less. You’ve got tighter swing radii, soft fill dirt instead of engineered pads, neighbors walking dogs through your work zone, and overhead service drops snaking to every house on the street [1]. OSHA data shows struck-by incidents — including lifted loads — account for roughly 8–10% of annual US construction fatalities, and crane electrocutions cluster around the low-voltage overhead lines common in neighborhoods [1].
In this guide you’ll get a field-tested playbook: how to plan a lift, set up on questionable ground, rig loads that don’t shift, keep people out of the drop zone, and know when this job belongs to a certified operator instead of you. Safety-first doesn’t mean slow. It means you finish the day with the beam set and the house intact.
Maintain a minimum 10-foot clearance from power lines up to 50kV and treat every line as energized until the utility verifies otherwise — most crane electrocut…
Sling angles overload rigging fast: 60° puts 115% load per leg and 45° hits roughly 141% — keep angles at 60° or better or upsize hardware.
Residential lots are full of fill dirt, septic fields, and backfill that won’t hold outriggers — use bearing pads, set up level, and call 811 before any lift i…
Nobody under a suspended load, ever. Use guide ropes, one designated signal person, and physical barriers to keep neighbors and bystanders out of the fall zone.
Since 2018–2019, OSHA requires nationally certified crane operators — renting a crane bare and operating it yourself typically voids insurance coverage and put…
Plan the Lift Before Anything Leaves the Ground
Every safe residential lift starts with a written plan made before the equipment rolls in — a site walkthrough, a known load weight, a haul route, and a designated landing zone. According to OSHA guidance, non-routine and critical lifts call for a formal lift plan [1]. On a residential job, treat nearly every lift as non-routine, because nothing about a backyard is standardized.
Here’s what planning actually looks like. Last spring I scoped a hot tub set into a sloped backyard. Before booking the crane, we walked the site and found three problems: a septic field where the outriggers would land, a 25-foot maple in the swing path, and an overhead service drop at the property line. Any one of those, discovered on lift day, would have burned four hours of crane standby time at $300 an hour. Found a week early, they cost a phone call to the utility and a slightly different crane position.
- Call 811 before any lift that involves ground loading or excavation. Underground utilities, septic lines, and buried tanks can’t support outrigger loads [1].
- Weigh or calculate your load and compare it to the equipment’s load chart at your working radius — then keep a 10–20% safety margin below rated capacity [1].
- Map overhead lines and service drops and measure actual clearances with a range finder, not your eye.
- Check the forecast. Wind above 20–30 mph typically halts crane operations — schedule accordingly [1].
- Define the fall zone: where would this load land if a sling let go? Keep people and property out of it.
Also pull your local permits. Many municipalities require street-use permits for a crane parked on a public road, and noise ordinances can restrict lift hours. Getting flagged mid-lift by a code inspector is the most expensive planning failure there is, because the crane clock keeps running while you sort out paperwork.
Popular right now

Apple AirPods Pro 3 Wireless Earbuds with Active Noise Cancellation

KitchenAid Classic Series 4.5 Quart Tilt-Head Stand Mixer K45SS, Onyx Black

Ninja Specialty Coffee Maker CM401, 10-Cup Carafe, Fold-Away Frother, Black
As an affiliate, we earn on qualifying purchases.
Why Soft Backyards Sink Cranes: Ground Setup Done Right
Ground conditions are the most underestimated hazard in residential lifting. Residential lots are full of fill dirt, old septic fields, drainage trenches, and recently dug foundation backfill — soil that looks firm and deflects like a mattress under a 40,000-pound point load. Setup is where cranes tip, and a tipped crane doesn’t just cost money; it lands on houses.
The physics is simple. An outrigger concentrates the machine’s weight plus a share of the load onto a pad roughly the size of a dinner plate. Spread that load with outrigger pads or timber mats and you multiply the bearing area tenfold. Skip them on soft ground and you’re betting the neighbor’s fence line on soil you’ve never tested [1].
My rule from the field: if you can push a rebar stake more than 12 inches into the ground with hand pressure, that soil won’t hold an outrigger without mats. And stay well clear of excavations — keep outriggers at least the depth of the trench away from its edge, farther in loose soil. A foundation wall you just poured is not a bearing surface; it’s a future crack.
Level matters too. Cranes and telehandlers are rated for level setup. A machine two degrees off level can lose a meaningful chunk of its rated capacity, and the load chart won’t warn you — the load moment indicator might, if the machine has one and it’s calibrated. Set up level, on pads, on verified ground. If you can’t verify the ground, don’t set up.
Power Lines: The Deadliest Thing on Your Street
Power line contact is the leading cause of crane-related electrocutions, and most incidents involve the low-voltage overhead lines that run through essentially every residential neighborhood in America [1]. The line from the pole to your house — the one at eye level over the driveway — is exactly the kind that kills operators.
The numbers are specific, so memorize them. OSHA requires a minimum clearance of 10 feet from power lines up to 50kV, with greater distances for higher voltages [1]. And here’s the rule most DIY operators miss: treat every line as energized until the utility verifies otherwise. That innocent-looking drop could be 240V house service or a 13kV distribution line. You cannot tell by looking.
Practical steps that work on real jobs:
- Walk the swing radius and measure clearance to every line with a laser range finder — pacing it off is not measurement.
- Assign a dedicated spotter whose only job is watching clearance, not guiding the load [1]. One task, one person.
- If the lift must come within the exclusion zone, call the utility. They can de-energize, cover lines with insulating blankets, or restrict the work window. Most do it free or cheap.
- Remember that a boom doesn’t have to touch the line — electricity can arc across a gap, especially in humid weather.
The scenario that keeps safety officers up at night: operator focuses on the load, spotter focuses on the landing zone, nobody watches the boom tip. The spotter who watches the load is not watching the line. Assign roles explicitly or don’t run the lift.
Rigging Basics That Keep Your Load (and Crew) Intact
Rigging failures cause a significant share of lifting accidents, and they almost always trace back to three things: worn hardware, wrong hitch types, and unbalanced loads [1]. Rigging is the cheapest part of the lift to get right and the fastest way to ruin a day when you get it wrong.
Start with inspection. Every sling, shackle, and hook gets a visual check before every use — no exceptions. Cut strands on a synthetic sling, a stretched or bent hook, a shackle pin with worn threads: tag it out and cut it up so nobody ‘rescues’ it from the scrap bin. OSHA requires documented daily equipment inspections for lifting machinery, and rigging hardware is part of that discipline [1].
Now the part that bites smart people: sling angles multiply load forces. A two-legged sling at a 60-degree angle puts about 115% of its share of the load on each leg. Drop to 45 degrees and you’re near 141%. That brand-new 5,000-pound-rated sling pair, rigged wide around a beam, can be overloaded lifting a 6,000-pound load that ‘fits the chart.’ Keep sling angles at 60 degrees or better, or upsize the hardware.
| Sling Angle (from horizontal) | Load Factor per Leg | What It Means |
|---|---|---|
| 90° (vertical) | 100% | Ideal — pure share of load |
| 60° | 115% | Acceptable, plan capacity accordingly |
| 45° | ~141% | Caution — upsize rigging or narrow the pick |
| 30° | 200% | Never — re-rig the pick |
Finally, find the center of gravity and keep it below the hook. Rig an off-center load and it will swing, shift, or dump when it breaks the ground. Test every pick: lift two inches, check level and stability, then commit. That two-inch habit has saved me more close calls than any other single practice.
People Management: Who Stands Where and Who Talks
Residential job sites have no controlled perimeter. Unlike a commercial site with fencing and badged access, your lift happens next to sidewalks, mail carriers, school kids, and a neighbor’s dog with poor judgment. Managing people is a bigger safety task on a home project than on a construction site, and most homeowners don’t plan a minute for it.
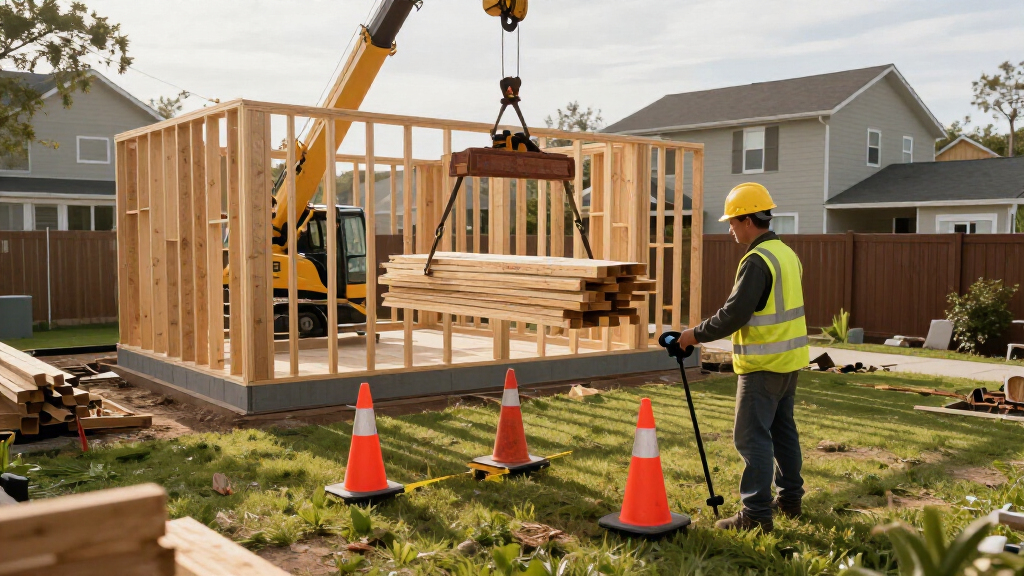
The absolute rule, non-negotiable: nobody stands, walks, or works under a suspended load — ever [1]. Not to ‘guide it in quick.’ Not the homeowner with his hand on the beam. Loads fall in under two seconds; you cannot react that fast, and a steel beam doesn’t leave survivors. Guide ropes from outside the fall zone do the same job without a funeral.
Communication needs one throat to choke. OSHA’s crane rules (29 CFR 1926.1400, Subpart CC) formalized signal person requirements, and since 2018–2019, crane operators need national certification plus employer evaluation [1]. Even on a small lift, the principle holds: one designated signal person, standardized hand signals everyone agrees on beforehand, or radios if the machine noise drowns voices. Two people both signaling the operator is how loads get driven into walls.
Your minimum PPE kit for anyone inside the work zone: hard hat, high-visibility vest, steel-toed boots, and gloves for anyone touching rigging [1]. And before the lift, walk the perimeter — cones, caution tape, a physical barrier between the swing radius and the sidewalk. A $30 roll of fence fabric is cheaper than the lawsuit that follows a struck bystander.
DIY Lift or Hire a Pro: An Honest Contractor’s Breakdown
Hire the lift out when it involves a crane, any load over about one ton, proximity to power lines, or lifting over an occupied structure. Do it yourself when it’s a compact machine you’re trained on, on flat verified ground, with light loads and generous clearances. The growth of equipment rental has put real lifting capacity in homeowners’ hands — and amateur-related incidents have risen with it [1].
| Factor | DIY Rental Makes Sense | Hire a Certified Operator |
|---|---|---|
| Load weight | Under ~2,000 lbs, easy rigging points | Over 2,000 lbs or unknown weight |
| Machine type | Tracked mini-crane, engine hoist, gantry | Any mobile crane, telehandler over 30 ft |
| Site conditions | Flat, firm, clear of lines | Soft ground, tight access, lines nearby |
| Consequence of failure | Dented lumber, bruised ego | Structure damage, injury, utility contact |
| Insurance | Often excluded on homeowner policies | Carrier carries GL coverage |
Run that math honestly. A rented crane with operator runs $400–$800 an hour in most markets. The same machine rented bare looks cheaper until you add the deductible on your homeowner’s policy, which typically excludes damage from heavy equipment operation by untrained persons. Renting a telehandler without certification isn’t just unsafe — on many policies it’s uncovered.
And when hiring, vet the contractor: current OSHA-compliant operator certification, general liability insurance with a certificate naming you, references from residential work specifically, and a written lift plan for anything non-routine. A pro who bristles at those questions is telling you something. Listen.
Your 10-Minute Pre-Lift Checklist to Run Every Single Time
A pre-lift checklist takes ten minutes and catches the failures that cause the vast majority of residential lifting accidents: power lines, ground setup, rigging condition, load weight, and people placement. The top safety tips for operating heavy lifting equipment all collapse into one habit — inspect and verify before the machine moves. Based on established industry practice, here’s the version I’ve run for twenty years [1].
- Walk the swing radius — lines measured, obstructions identified, fall zone cleared.
- Verify ground and pads — level setup, mats under every outrigger, distance from excavations.
- Check fluids, hydraulics, cables, hooks, and safety latches — document it [1].
- Confirm load weight against the load chart at your actual radius, with margin.
- Inspect every sling, shackle, and hook — tag out anything suspect.
- Confirm sling angles at 60° or better, load balanced, center of gravity below the hook.
- Assign the signal person and agree on hand signals or radio channel.
- Brief everyone — no one under the load, bystanders behind barriers.
- Check wind and weather — postpone above 20–30 mph gusts [1].
- Do a two-inch test pick — verify stability before full commit.
Ten items. Ten minutes. Print it, laminate it, clip it to the machine. The checklist doesn’t make you cautious — it makes you fast, because nothing on lift day surprises you.
Frequently Asked Questions
Do I need a license or certification to operate a crane on my own property?
For true cranes, yes — OSHA’s certification requirements for crane operators took full effect in 2018–2019 and apply to construction activity regardless of who owns the property [1]. A homeowner doing work on their own residence in some jurisdictions has exemptions, but your insurance may not honor them. For forklifts and telehandlers, OSHA requires documented training even without a license. When in doubt, rent with an operator.
How close can lifting equipment legally operate to power lines?
OSHA requires a minimum of 10 feet of clearance from power lines up to 50kV, with the required distance increasing for higher voltages [1]. Residential service drops usually fall under the 10-foot rule, but always treat lines as energized and verify voltage with the utility. If your lift needs to get closer, arrange for the utility to de-energize or insulate the line first.
Is it cheaper to rent a crane myself or hire one with an operator?
Bare rentals look cheaper — often $200–$400 less per day — but certified operators typically run $400–$800 per hour and come with insurance, rigging gear, and a load chart they actually know how to read. More importantly, most homeowner policies exclude damage caused by untrained heavy equipment operation, so one dropped beam erases years of savings. For anything over a ton or near structures and lines, hire the operator.
What ground conditions are unsafe for outriggers?
Fill dirt, recently backfilled foundations, septic fields, drainage trenches, and saturated soil after rain are all poor bearing surfaces [1]. A quick field test: if you can push a rebar stake more than 12 inches in by hand, the ground needs mats — or a different setup position. Always use outrigger pads, keep the machine level, and stay at least the depth of any excavation away from its edge.
What permits do I need for lifting equipment in a residential neighborhood?
Requirements vary by municipality, but common ones include street-use or road-closure permits for equipment on public roads, noise ordinance compliance restricting lift hours, and zoning rules about working near property lines. If the boom will reach over a neighbor’s property or the load travels over their roof, get written permission — overflight is a liability issue even where no permit exists. Check with your local building department before booking equipment.
Can a crane legally lift a load over my house or a neighbor’s roof?
There’s no federal ban, but most professional crane companies refuse to swing loads over occupied structures unless it’s a planned critical lift with exclusion zones underneath, because a rigging failure means the load lands on the house. Practically, plan the lift so loads travel over open ground. If there’s no alternative, it needs a formal lift plan, and never let anyone remain inside the fall zone under the load path [1].
Conclusion
Here’s the whole article in one sentence: the lift is won or lost before the machine starts — in the site walk, the load chart math, the sling inspection, and the conversation where you tell your neighbor’s kid to stand behind the tape. Machines don’t cause most accidents. Skipped steps do. Ten minutes of checklist discipline beats any amount of fast reflexes.
So before your next beam, spa, or HVAC unit goes up, ask yourself one question: if this load drops right now, what does it land on? If you don’t love the answer, change the plan. That question — asked early, answered honestly — is the cheapest safety equipment you’ll ever own.