
TL;DR

Get business pricing on tools and workshop supplies
- Business-only prices and quantity discounts
- Tax-exempt purchasing
- Multiple users, one account, clear invoices
To select the right drywall lift, check the actual weight and dimensions of your panels, the lift’s rated capacity and working height, and whether its cradle supports your ceiling or wall orientation. Then compare setup, transport, stability, and how often you will use it: renting usually suits one room, while frequent jobs can justify buying a serviceable, easy-to-move model.
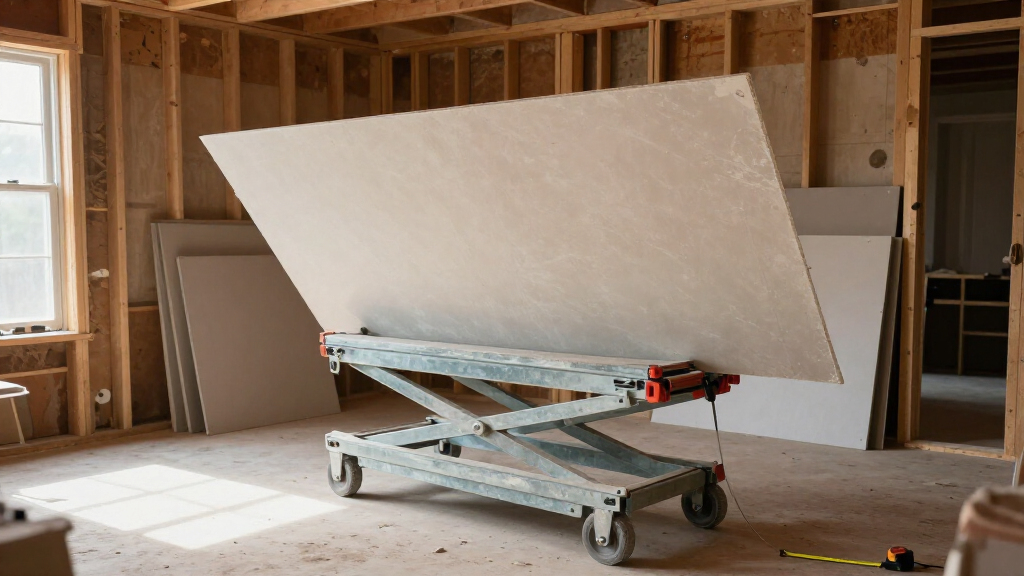
A drywall sheet can feel manageable at waist height and turn into a stubborn sail the moment you raise it overhead. A lift takes much of that strain out of the job, but the wrong one can still leave you wrestling a panel that will not fit, reach, or sit securely.
To select a drywall lift for your project size, start with the panels you will actually handle, then check the ceiling height, orientation, room access, and job frequency. This guide will help you decide whether to rent or buy, which specifications deserve a close read, and when an unusual ceiling calls for a different plan.
You will also get a practical measuring checklist and safety steps. A lift can make one-person positioning possible in the right conditions, but it does not make every panel or worksite safe for solo handling.
Check the actual weight and dimensions of your heaviest panel against the lift’s rated capacity and cradle limits.
Confirm working height and permitted panel orientation in the manual; maximum height can depend on setup.
Renting often fits a one-time room job, while regular use may justify buying after you count transport, storage, and maintenance.
Measure doorways, turns, vehicle openings, and the lift’s folded dimensions before pickup or delivery.
Inspect the cable, winch, locks, braces, wheels, and cradle; lock casters and keep people clear from raised panels.
How to Select the Right Drywall Lift for Your Project Size
Start with the panels you will actually handle. Match their weight and dimensions to the lift, then confirm reach, orientation, room access, and how often you will use it.
lb per square foot, depending on type
For a 4 × 12 ft sheet
Often practical for a one-room job
Ownership cost, upkeep, and transport
Size the lift to the toughest panel
A 4 × 12 ft sheet covers 48 square feet. At roughly 1.5–2.5 lb per square foot, that is about 72–120 lb before specialty-board differences. Use the board maker’s actual weight and the lift manual’s capacity and cradle limits.
Estimated weight by panel area
Illustrative range for standard drywall at 1.5–2.5 lb per square foot
Specialty, moisture-resistant, and fire-rated board can weigh more. Verify actual product specifications; treat the rated load as a firm limit.
Height, angle, and access work together
Measure the hardest spot
Measure floor to the highest installation point. Confirm the usable working height in the manual with your panel size and setup; advertised maximum reach may depend on configuration.
Confirm how the board sits
Ceilings often need horizontal support; tall walls may need vertical positioning. Slopes and stairwells can require an approved angled cradle setup.
Trace the route in and out
Measure doorways, turns, stairs, vehicle openings, and the lift’s folded dimensions. Check base footprint and maneuvering space before raising a panel.
Match the cost to how often you work
| Project pattern | Often practical | What to prioritize |
|---|---|---|
| One room, occasional job | ✓ Rent or basic manual lift | Rental window, delivery and pickup fees, compact storage, quick setup |
| Room renovations or regular use | ~ Compare both costs | Load and reach fit, locking wheels, sturdy frame, common panel sizes |
| Frequent professional jobs | ✓ Buying may pay off | Serviceable parts, durable transport, setup speed, storage, total upkeep |
| Unusual ceiling or access | ! Verify first | Approved angle and height, panel path, doorway clearance, safe configuration |
Compare the full rental period—including delays and pickup timing—with purchase, maintenance, transport, and storage across the jobs you expect.
Before you book or buy
Panel
Record type, thickness, width, length, and actual weight.
Capacity
Compare panel load and size with rated limits and cradle support.
Reach
Confirm working height with the intended panel orientation.
Route
Measure room access, vehicle openings, and folded dimensions.
Condition
Inspect the lift and plan safe positioning before loading.
From panel to safe position
Panel demand
Actual sheet weight and dimensions define the load and cradle fit.
Room geometry
Ceiling height, slope, stairs, and approach path define reach and angle.
Lift match
Manual limits confirm whether that load and configuration are permitted.
Job economics
Use frequency, transport, storage, and service needs inform rent or buy.
Inspect, lock, and keep clear
A drywall lift can support positioning, but it does not make every panel or worksite safe for solo handling. Follow the manufacturer’s operating instructions and get help when conditions call for it.
Start with the panels, not the room’s square footage
Choose a drywall lift by matching its rated load and cradle dimensions to the largest, heaviest panel you plan to install. Room area alone will not tell you whether a lift can support a 4-by-12-foot sheet or handle the extra weight of specialty board. The panel sets the actual demand on the frame and winch, while its length and width determine how it must sit on the cradle. A lift with enough capacity can still be unsuitable if the board extends beyond the supported configuration.
Standard drywall commonly weighs about 1.5 to 2.5 pounds per square foot, depending on thickness and type. A 4-by-12 sheet covers 48 square feet, which puts a rough estimate between 72 and 120 pounds. That spread is wide enough to matter: check the board maker’s actual specifications and compare them with the lift manual’s rated capacity. The difference between a light sheet and a heavy one affects not only whether the lift is within its limit, but also how difficult loading and repositioning may be.
For example, a small bedroom job might use standard half-inch panels, while a garage or utility room could call for thicker fire-rated board. Moisture-resistant, fire-rated, and other specialty boards can weigh more than a basic sheet, so do not assume yesterday’s panel weight applies. The cradle also has to support the panel’s dimensions in the manufacturer-approved setup. A long panel may create more leverage on the cradle than a shorter one, so capacity alone does not establish that every panel size is acceptable.
Write down the panel type, thickness, width, length, and weight before you rent or shop. Treat the load rating as a firm limit, not a target to exceed because the winch feels strong. The cable and frame carry the load overhead; a smooth crank is no proof that a questionable load is safe. Staying within both the weight and size limits gives the lift a better chance of remaining stable and keeps the board supported as it rises.
Popular right now

KitchenAid Classic Series 4.5 Quart Tilt-Head Stand Mixer (K45SS), Onyx Black

Ninja Specialty Coffee Maker CM401, 10-Cup Carafe, Fold-Away Frother, Black

Ninja Flip Toaster Oven & Air Fryer, 8-in-1, Stainless Steel, SP151
As an affiliate, we earn on qualifying purchases.
Match lift height and panel orientation to the hardest spot
Pick a lift that reaches your highest installation point with the panel in the orientation you need. A stated maximum height is not enough by itself; the allowed setup can change with the panel size, cradle position, or lift configuration. The usable height is the height the lift can safely reach while supporting your specific panel in its approved position.
Measure from the floor to the ceiling, then check the manual for working height and setup limits. A nine-foot ceiling may fit an ordinary lift configuration, while a vaulted peak, stairwell, or sloped ceiling can require a different angle or more reach. If the listing gives a maximum height without saying which panel setup achieves it, ask the rental counter or manufacturer before committing. A lift that comes up short can leave you trying to finish the last part by hand, which gives back the strain and control the lift was meant to reduce.
Panel orientation matters just as much. Ceiling work usually means holding a board horizontally, while a tall wall may call for vertical positioning. An angled cradle can help with a slope or stairwell, but only if the model specifically permits that configuration. Imagine a landing where a long sheet must pass above a railing: reach alone will not solve a cradle that cannot tilt as required. Orientation also changes the panel’s balance, so an unsupported or unapproved angle can make the load harder to control.
Make a simple sketch of the room and mark the highest point, slope, stairs, and likely approach path. Then confirm that the lift manual allows the planned orientation and height together. For unusual ceilings, verify the setup before buying or taking a rental home; discovering a mismatch with a sheet already loaded is a poor time to improvise. Confirming the combined setup matters because height, angle, and panel size are related limits, not independent features to check in isolation.
Know when renting beats buying for a one-room job
Renting usually makes more sense when you need a drywall lift for one short project and have no place to store it afterward. Buying can pay off when you use a suitable lift regularly and can transport, maintain, and store it between jobs. The choice depends on the total cost and convenience across the expected jobs, not simply on comparing a rental day with the purchase price.
For a single bedroom ceiling, a basic manual lift or a short rental period may spare you the price, storage footprint, and upkeep of ownership. Ask about the rental window, delivery fees, pickup timing, and whether the clock starts when you collect the machine or when you begin work. A delay caused by joint compound, a missing fastener, or a slow delivery can turn a cheap-looking daily rate into several days of charges. Planning the work and supplies before pickup can therefore matter as much as finding a low daily rate.
For a contractor hanging board across several homes each month, the calculation changes. Faster setup, dependable parts, and a frame that tolerates frequent transport can save time job after job. Compare total ownership costs with repeated rental, including service, replacement cables or wear parts, transport, and storage. A powered lift may reduce repetitive cranking on a large, frequent job, but it still needs correct loading and stable placement. Its higher upfront cost is easier to justify when the time saved recurs often; for occasional work, the added expense and maintenance may not pay back.
Here is a useful way to compare: estimate the full cost of a rental for this project, then compare it with buying and likely upkeep over the number of jobs you expect. Include how long you will need the lift and whether a delay could extend the rental. If your schedule is uncertain, renting also lets you try a manual model before deciding whether powered lifting or a more durable frame is worth the expense. That trial can reveal whether convenience features solve a recurring problem or simply add cost for a task you rarely do.
Check stability, setup, and the route into the room
A lift has to reach the work area, stand firmly there, and fit through every doorway or turn along the way. Before you choose a model, check its base footprint, caster locks, folded dimensions, total weight, and the vehicle openings you will use. These details involve a tradeoff: a broader, heavier frame may feel more substantial, but can be harder to move through the house and transport to the job.
A wide base can help stability, but it may be awkward in a narrow bathroom or hallway. Measure the tightest doorway and passage, including turns, and compare them with the lift’s transport dimensions. A model that looks compact in a listing may still be heavy to lift into a car or too wide to steer around a stair landing. Tool-free assembly and a folding frame can save setup time, but they do not replace those measurements. If moving the lift becomes difficult, you may be tempted to reposition it while loaded or rush setup, so ease of transport contributes to safe use as well as convenience.
On site, assemble the lift as its manual directs and place it on a firm, level surface. Lock the casters before raising a panel. If the floor slopes, feels soft, or is cluttered with offcuts, clear and assess the area before loading; a rolling base can shift at the exact moment you need it still. Stability depends on the surface and setup as well as the lift’s design, so a wide base cannot compensate for a poor place to work.
For example, a lift may fit through a garage door but not through the narrow interior doorway to the ceiling you are boarding. Check the full path before arranging delivery or loading the vehicle. Ease of movement also affects productivity: on a multi-room renovation, a compact lift you can reposition safely may be more useful than a bulkier model with impressive reach that stays parked outside the room. The best balance is a lift that reaches the work while still fitting the route and the space where it must stand.
Use this five-step check before you book or buy
Before you select or rent a drywall lift, verify the load, height, orientation, access, and condition in that order. This five-step check catches the most common mismatches while the panel is still on the floor and the rental counter is still in reach. Each check informs the next: a panel that exceeds the capacity or an installation the lift cannot reach rules out a model before you spend time measuring its transport route.
- Record the panel details. Note material, thickness, dimensions, and manufacturer-stated weight; use the heaviest sheet in the project.
- Measure the installation. Record ceiling height, slopes, stairs, and the position where the panel must land.
- Check the manual’s limits. Confirm the rated load, supported panel dimensions, maximum working height, and permitted cradle angles for that setup.
- Measure access and transport. Check doorways, turns, vehicle openings, folded size, and the lift’s weight.
- Inspect before loading. Look over the cable, winch, locks, braces, wheels, and cradle; report damage and follow the operating instructions.
Suppose you are renting a lift for two ceiling rooms and a stairwell wall. The first two rooms may work with a standard horizontal setup, while the stairwell needs an approved angle and a clear route. Confirm each configuration before the rental day so you do not discover that one part of the project falls outside the lift’s limits. Checking room by room also prevents a model that works for the easiest ceiling from being mistaken for one that covers the whole project.
At the site, keep people clear from beneath a raised sheet and do not exceed the stated capacity or height. Load the board as instructed; never treat an improvised strap, extra extension, or unapproved cradle position as a clever shortcut. When the panel or room makes solo handling awkward, get help rather than forcing the lift into a risky setup. The point of the checks is to catch a mismatch early, when you can choose another lift or method without a suspended panel in the way.
Scale the lift choice to the job you actually have
A small occasional repair, a full-room renovation, and daily professional work call for different priorities. Match the lift to frequency and site demands: compact simplicity for occasional use, balanced capacity and reach for room renovations, and durability and serviceability for repeated jobs. This helps avoid paying for features that do not solve a real problem, while also avoiding a lightweight model that wears out or slows down under frequent use.
For one standard bedroom with ordinary ceiling height, a manual lift or short rental may be enough. Focus on setup time, storage, and a manageable rental period rather than powered features you may never use again. A homeowner replacing a few ceiling sheets may value easy transport more than a faster crank. If the job is short, the time saved by power may be smaller than the added cost and setup involved.
For a whole-house renovation or regular use, stable locking wheels, appropriate reach, and a cradle that handles the panels you install most often matter more. Frequent professional work puts more emphasis on a sturdy frame, quick setup, parts availability, and transport between sites. Powered lifting can help reduce repetitive cranking across a large job, though the operator still needs to manage loading and position safely. Parts availability becomes especially relevant when downtime delays paid work; a durable model is useful only if it can be serviced when something wears out.
Special layouts deserve a separate check. A vaulted ceiling, stairwell, unusually tall room, or oversized panel may exceed what a general-purpose model can safely reach or position. If the manual does not clearly support the configuration, ask the rental provider or manufacturer, or use a different approved access method. The lift that handles a normal flat ceiling is not automatically the right tool for every surface. In these cases, choosing a model with more general capacity may still not solve the problem if its cradle cannot safely hold the board at the required angle.
Frequently Asked Questions
Can one person use a drywall lift?
Many lifts are designed to let one person raise and position a panel, but loading and maneuvering can still be awkward. Follow the manual, use a stable surface, and get help when the panel or worksite makes solo handling unsafe.
Do I need a drywall lift for a ceiling?
A lift supports a sheet overhead while you position and fasten it, which can reduce the strain of holding board above your head. For a small ceiling job, renting may cost less than buying and storing a lift.
What size drywall lift should I choose?
Match the lift to your heaviest and largest panel, required working height, and intended orientation. Check the manufacturer’s rated limits and manual; a general label such as “standard size” does not confirm that a particular setup will work.
Will a drywall lift fit through my doorway or in my vehicle?
Check the folded dimensions, base width, total weight, and transport instructions. Measure the narrowest doorway, tightest turn, and vehicle opening before you book or buy, since the lift must travel the whole route to the work area.
Can the same lift handle walls, ceilings, and sloped ceilings?
Some lifts support several panel positions, but cradle angles and allowed configurations vary by model. Check the manual for the specific panel size and orientation you plan to use, especially for stairs and sloped ceilings.
Should I rent or buy a drywall lift?
Renting often suits an occasional room renovation because it avoids storage and ongoing maintenance. Buying can make sense for frequent work; compare repeated rental costs with purchase, transport, service, and storage over the jobs you expect.
How do I use a drywall lift safely?
Assemble it on a firm, level surface, load the panel as directed, lock the casters, and keep people clear from beneath the raised sheet. Inspect the cable, winch, locks, braces, wheels, and cradle, and never exceed the stated load or height limits.
Conclusion
Choose the lift around the heaviest panel, highest placement, and tightest access your project demands. Check the manual’s real limits, then decide whether rental or ownership fits how often you will use it.
Measure first, inspect carefully, and let the lift hold the board while you focus on placing it square. A well-matched lift turns an overhead wrestling match into a steady, controlled rise.