
TL;DR

Get business pricing on tools and workshop supplies
- Business-only prices and quantity discounts
- Tax-exempt purchasing
- Multiple users, one account, clear invoices
The best ladder accessories to improve safety and efficiency are compatible levelers, stabilizers, tool organizers, protective feet, and task-specific platforms chosen for your ladder and work area. Check manufacturer instructions, inspect every connection, keep the combined load within the ladder rating, and maintain three points of contact while climbing; accessories cannot make a damaged ladder or unstable setup safe.
A ladder accessory can solve a real problem, but one that does not fit can add a new one. A loose bucket hook swings into your shin; a mismatched stabilizer shifts where you least want it. The useful question is not which add-on has the most features. It is which one fits your ladder, your task, and the surface under your feet.
This guide walks through the best ladder accessories for stability, tool handling, and surface protection. You’ll learn what each type can do, where it falls short, how to check compatibility, and when a ladder accessory is the wrong fix. Think of accessories as part of the setup, like the right bit for a screw: helpful when matched, frustrating or unsafe when improvised.
Before any add-on goes on, read the ladder’s labels and manual. Count your own weight, clothing, tools, materials, and accessory load against the ladder’s duty rating. For electrical work, shut off and verify power where appropriate, keep clear of energized lines, and use the required PPE; hire a licensed electrician for electrical work that calls for one.
Confirm the ladder model, approved attachment points, and accessory instructions before buying or fitting anything.
Use levelers only on suitable firm ground and never prop a ladder with bricks, loose boards, or other improvised wedges.
A stabilizer may improve wall clearance or contact in approved setups, but it cannot fix bad footing, overreaching, or an incorrect ladder angle.
Count the user, clothing, tools, materials, and accessory contents against the ladder’s duty rating.
Inspect ladder and accessory hardware before every use, and remove damaged parts from service.
Field guide / ladder setup
Best Ladder Accessories to Improve Safety and Efficiency
Choose add-ons that match your ladder, task, and work surface. The right accessory can steady a setup, keep tools close, or protect a surface—but fit, footing, load limits, and safe climbing still come first.
01 / Choose by task
Useful add-ons, matched to the job
There is no universal accessory that makes every ladder safe. Start with the ladder type and the problem you need to solve.
Stability
Levelers & adjustable feet
Help level a compatible ladder on suitable, firm uneven ground. Secure and adjust them as instructed; they cannot stabilize soft or shifting terrain.
Clearance
Stabilizers & standoffs
May widen contact or hold an extension ladder away from a wall, gutter, or siding. Confirm approved attachment points and a solid contact surface.
Tool handling
Trays, buckets & hooks
Keep frequently used supplies nearby and reduce trips. Secure every item, avoid falling or sharp loads, and keep the climbing path clear.
Task support
Top platforms
Provide a place for small tools or supplies when the ladder supports the platform and its load. Never stand on a top cap or prohibited step.
Surface care
Protective pads & feet
Help reduce marks and may improve grip on suitable surfaces. Keep contact areas clean and replace worn pads or feet.
Site-specific
Mats, anchors & rope parts
Mats and anchors suit certain conditions; they are no cure for unstable ground. Use only ladder-maker specified rope and pulley replacement parts.
02 / Capacity check
Every item counts toward the rating
Accessories add weight and can change how the load sits on the ladder. Keep the complete working load within the ladder’s duty rating.
A tool tray full of supplies counts against the same limit as the person on the ladder. Include clothing, materials, accessory weight, and everything carried or attached. Follow both manufacturers’ instructions, and stop if the fit or load limit is unclear.
03 / Before the climb
A five-point setup check
Inspect accessories alongside the ladder before every use. Remove damaged equipment from service.
Confirm fit
Verify ladder model, approved attachment points, and accessory instructions.
Check footing
Use levelers only on suitable firm ground. Never use bricks, loose boards, or improvised wedges.
Secure hardware
Check clamps, fasteners, locks, and contact surfaces before loading the ladder.
Inspect condition
Look for cracks, loose parts, worn feet, corrosion, and missing hardware.
Climb safely
Keep three points of contact. Keep your belt buckle between the rails and move the ladder as needed.
04 / Match the fix
What an accessory can—and cannot—do
Use the right equipment for the condition. If you cannot establish a stable setup with approved gear, change the access method.
| Need | Accessory may help | Still required |
|---|---|---|
| Uneven ground | ✓ Compatible leveler on firm ground | ~ Verify locks, support, and ground stability under load |
| Wall or gutter clearance | ✓ Approved stabilizer or standoff | ~ Confirm secure fit, sound contact surface, and correct ladder angle |
| Tools within reach | ✓ Secure tray, bucket, or organizer | ~ Count contents in total load; keep climbing path clear |
| Soft, sloped, or shifting ground | ✗ A mat or leveler is not a universal remedy | ✓ Move the work or use suitable access equipment |
| Damaged ladder or unsafe habits | ✗ No accessory makes these safe | ✓ Remove damaged gear; correct the setup and climbing practice |
Traceability / safe setup flow
From task to first step
Each choice connects to the next. If any link fails, pause and reassess before climbing.
Identify the task
Note the height, work area, surface, and tools you need.
Verify compatibility
Match the accessory to the ladder model and maker instructions.
Set and inspect
Secure the accessory, check firm footing, and inspect all hardware.
Check load & climb
Stay within rating and maintain three points of contact.
Start with fit and stability before buying an add-on
The best ladder accessories to improve safety and efficiency are the ones approved for your exact ladder and task; there is no universal add-on that makes every ladder safe. Step ladders, extension ladders, and platform ladders have different frames, rungs, and attachment points. Read the model label and manual before buying, then confirm the accessory maker lists a compatible ladder or series. Compatibility matters because an attachment transfers force into the ladder at specific points. If the clamp is too wide, too narrow, or positioned differently than intended, it may shift under a side load even when it initially feels snug.
That check matters even when two ladders look nearly identical. A clamp that seats cleanly on one rail may sit crooked on another, leaving a stabilizer to rock under pressure. For example, if you are buying a wall standoff for an extension ladder to clear a gutter, verify both the ladder’s approved attachment points and the clearance the standoff provides. Similar hardware is not proof of a secure fit. The tradeoff is that a model-specific attachment may limit your choices, but it gives you a known fit and load path instead of asking you to judge safety by appearance.
Accessories can help make common tasks easier by improving stability or keeping supplies nearby, but they do not correct a damaged ladder, a poor angle, soft ground, or bad climbing habits. A new attachment also adds weight and may change how the load sits on the ladder. Follow both manufacturers’ instructions, and stop if the fit or load limit is unclear. An accessory that solves one problem can create another: a tool tray reduces trips but adds weight, while a standoff improves clearance but changes the contact points and may make transport more awkward.
Fit first: An accessory is part of the working setup. If the maker does not confirm that it fits your ladder, do not treat a tight-looking clamp as approval.
Popular right now

De'Longhi Rivelia Fully Automatic Espresso Machine with Milk Frother, White

Vitamix Propel Series 510 Professional-Grade Blender, 3 Programs, Black

Vitamix Propel Series 750 Professional-Grade Blender, 4 Programs, Black
As an affiliate, we earn on qualifying purchases.
Use a leveler only when uneven ground is the real problem
A compatible ladder leveler or adjustable foot can help a ladder stand level on certain uneven surfaces, but only when the ladder maker approves it and the device is installed as instructed. This can be useful on a firm path where one side sits slightly lower than the other. Leveling matters because unequal rail height can make the ladder lean or twist, concentrating force on one side and making the feet more likely to shift. It is not a fix for a steep bank, shifting gravel, mud, or ground that gives way under load.
Say you need to reach a low roof edge beside a sloped driveway. A proper leveler may adjust one side so the ladder rails sit as specified, while its lock keeps the foot from slipping. You still need to check that the ground is firm, the leveler is secured, and the ladder is set at the correct angle. A level bubble or adjustable leg cannot tell you whether the ground will settle once you climb. An adjustment that appears level while unloaded may become unstable if the surface compresses unevenly under the user’s weight.
Never wedge bricks, scraps of lumber, or a stack of pavers beneath a ladder. Those loose objects can rock, crack, or slide as your weight shifts. A ladder mat or anchor may suit some ground conditions, but it is not a universal remedy for soft or sloped terrain. If you cannot make a stable setup using approved equipment, move the work or use access equipment suited to the site. The practical tradeoff is extra setup time and equipment versus relying on a support whose behavior can change as soon as it is loaded.
For a homeowner painting a garage wall, a modest uneven patch may be manageable with an approved leveler on firm ground. On a steep hillside beside a two-story house, renting appropriate access equipment or hiring a qualified contractor is the safer call. The difference is not just the amount of height to correct: on a steep or yielding surface, the leveler may be unable to keep both feet supported as the ladder is loaded.
Add a stabilizer when wall clearance or contact needs improvement
A compatible extension-ladder stabilizer can widen the ladder’s contact area or hold it away from a wall, helping with certain setups such as reaching past a gutter. The wider stance can reduce the chance that a small sideways movement will shift the ladder, while a standoff can move pressure away from a fragile edge. It does not guarantee that the ladder will stay put, and it cannot correct unstable footing or a ladder set at the wrong angle. Use one only when the ladder manufacturer permits that model and attachment method.
Imagine cleaning a second-story gutter. A stabilizer may place the ladder rails on either side of the gutter so they do not bear directly against it, reducing contact with fragile metal. Before climbing, confirm the standoff sits firmly against a suitable surface, its fasteners are secure, and the ladder has firm footing. If the wall surface cannot take the contact or the stabilizer cannot sit square, choose another access method. A standoff moves the contact point and adds leverage, so a weak surface or poor fit can be more consequential than a mark on the gutter.
Some stabilizers also help keep a ladder farther from siding, windows, or other obstacles. But the extra reach can tempt you to lean sideways. Keep your belt buckle between the rails and move the ladder when the work moves. A wider stance is not permission to overreach. The accessory may reduce movement at the base, but leaning shifts your center of gravity beyond the ladder’s support area; the stabilizer cannot prevent that imbalance.
For a short household task, a correctly fitted stabilizer may be a practical DIY accessory. For repeated high work, fragile cladding, or a location near overhead electrical conductors, assess the full setup carefully and bring in a qualified professional when the hazards exceed your experience. Treat power lines as energized; keep the ladder and tools well away. A stabilizer does not insulate the ladder or reduce the electrical hazard, and its extra width may make it harder to position the ladder at a safe distance.
Keep tools close without carrying loose gear up the ladder
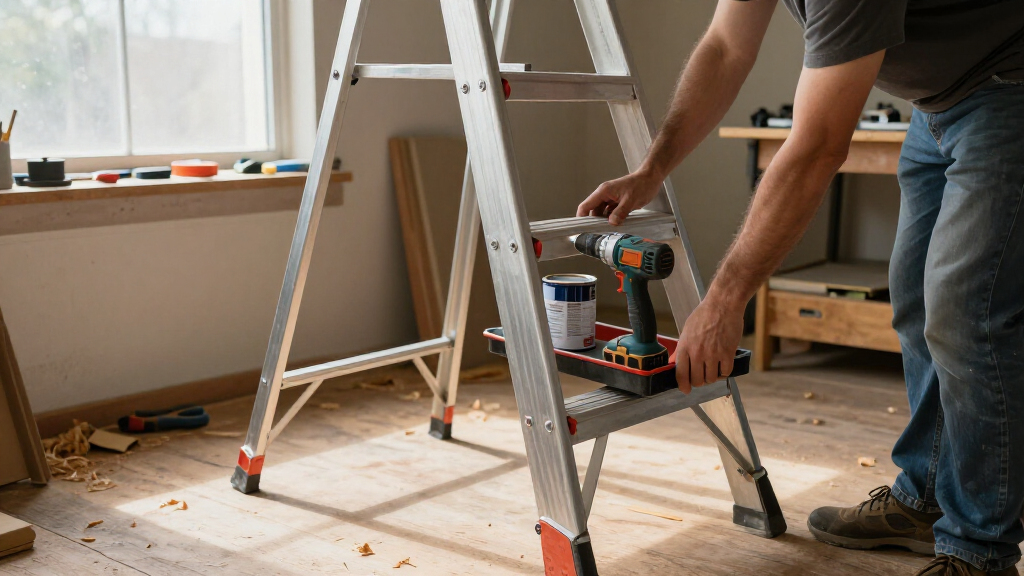
A ladder tool tray, bucket, hook, or organizer can keep frequently used supplies within reach and reduce trips up and down. Fewer trips can save time and reduce repeated climbing, but a tray that puts tools off to one side may pull your attention or weight in that direction. The best choice holds the items you need without obstructing the rungs, making you lean, or pushing the ladder beyond its rated capacity. Check that it attaches securely to the specific ladder and that its load limit covers the tools you plan to carry.
For example, when replacing a porch light, you might need a screwdriver, wire connectors, and a voltage tester. A secured tray can keep those small items from ending up on the ground, but you should climb with both hands free and maintain three points of contact. Place or retrieve tools only once positioned as the ladder instructions allow; do not climb with a handful of loose hardware or a drill swinging from your wrist. A tray is most useful when it stores light, frequently used items; heavier tools raise the combined load and can make the ladder feel less balanced as you reach for them.
Keep heavy, sharp, or bulky items on the ground until needed. A falling wrench can injure someone below, while a heavy tool at the side of the ladder can encourage an unsafe lean. Set a drop zone and keep other people clear. If the job needs a large collection of materials, a ladder is probably the wrong place to stage them. The more items you store overhead, the more time you spend managing them while elevated and the more weight the ladder must support.
Compact trays and quick-attach organizers are convenient, but convenience does not confirm a secure connection. Before each use, inspect the hook or clamp and tug it gently while the ladder is on the ground. Include the organizer and its contents in your load calculation. A ground-level check can reveal a loose attachment without exposing you to a fall, but it cannot replace checking that the attachment is approved and remains clear of climbing surfaces.
Protect walls, gutters, and floors with the right contact points
Protective pads, non-marking feet, and wall standoffs can reduce scuffs or surface damage, and some suitable feet can improve grip on the intended surface. Their performance depends on clean, unworn contact points and a product designed for that ladder and surface. A soft pad is not automatically a safer foot, and a smooth, dirty pad may slide. Surface protection and ladder stability are related but separate goals: material that cushions a wall may compress under load, so it must be designed to carry contact forces as well as prevent marks.
Picture setting an extension ladder against freshly painted fiber-cement siding. A suitable standoff can keep the rails off the wall, while clean feet sit flat on firm ground. If the same feet are caked in dried mud, the ladder may slip even though the pads look intact. Wipe contact surfaces, check for splits or uneven wear, and replace damaged parts according to the manufacturer’s guidance. Dirt can act like a low-friction layer between the foot and the ground, making the ladder less predictable when you shift your weight.
Indoors, non-marking feet may help protect a finished floor, but they cannot replace a stable setup. Keep the floor dry and clear of dust, cords, and drop cloths that can bunch beneath the ladder. Outdoors, a mat can protect a surface or help with a suitable setup, but it cannot turn loose soil into solid footing. A protective layer only works if it stays flat and does not slide; placing one over debris or a soft patch can conceal the very condition that needs attention.
Match the accessory to the contact point: pads for approved surface protection, standoffs for approved clearance, and feet designed for the ladder. If the ladder maker specifies replacement feet or parts, use those specified parts. A generic piece of rubber may look like a perfect fit and still alter how the ladder bears weight. The cost of a specified replacement is usually easier to manage than a ladder that rocks, slips, or damages the surface because its contact geometry has changed.
Choose a platform or handhold for comfort without changing how you climb
A ladder platform can provide a supported place for small supplies or a more comfortable standing area when the ladder is designed to accept it. A handhold can help with balance at an approved access point. Neither accessory replaces the ladder’s intended standing steps, three points of contact while climbing, or the manufacturer’s rules about where you may stand. These limits matter because the ladder is designed to carry load at specified places; standing or attaching weight elsewhere can change how forces travel through its rails.
For a painter cutting in a narrow strip above a doorway, a compatible platform may give a small, stable place for a brush and paint cup. That can reduce repeated reaching for supplies. It does not make the ladder taller, allow standing on the top cap, or support a larger paint bucket unless the manual explicitly permits that use. Check the platform’s load information and count the cup and tools with your own weight. A larger container may seem more efficient because it avoids refills, but its weight and sloshing paint can make the ladder harder to control.
Standing mats and comfort accessories also have limits. A mat that feels softer underfoot may help on a long task, but if it shifts or covers a rung, it creates a new hazard. Keep all climbing surfaces clear and use accessories only in the positions the ladder maker specifies. Comfort can make a task feel easier and encourage someone to stay up longer, but it does not reduce fatigue-related loss of attention or make a poor standing position acceptable.
If the work requires a long reach, both hands for an extended period, or frequent side-to-side movement, consider a suitable platform ladder, scaffold, or rented access system instead. A ladder accessory should support the way the ladder was designed to work, not invite you to improvise a new way to stand. Moving to a broader work platform takes more setup, but it can provide room to reposition without repeatedly stretching beyond the ladder’s stable working area.
Inspect accessories in a quick check before every climb
Inspect ladder accessories before every use, alongside the ladder, and remove damaged equipment from service. Look for cracks, bent parts, loose fasteners, corrosion, worn grip surfaces, missing pins, and straps that no longer hold tension. A small defect can matter when the accessory carries load or controls contact with a wall or the ground. The inspection is not just about whether a part is present: it is about whether it can still perform its role when weight or sideways force is applied.
Use this short sequence before a job:
- Read the setup: confirm the ladder and accessory instructions allow this combination and attachment point.
- Check the hardware: look for damage, missing parts, loose clamps, and worn feet or pads.
- Set the ladder: place it on firm, clear ground; adjust only with approved devices; then confirm the setup is stable.
- Count the load: include you, clothing, tools, materials, and accessory contents under the ladder’s duty rating.
- Protect the work zone: keep people clear of falling tools and maintain required PPE and hazard controls.
For instance, a painter who finds a cracked plastic tray should remove it before loading brushes, even if the ladder itself looks sound. The tray may break when the painter reaches for a brush, dropping tools or shifting balance. Do not tape over structural cracks or improvise replacement pins. A quick repair may hide the defect without restoring the part’s designed strength, leaving no reliable way to know how it will behave under load.
For electrical jobs, identify the circuit, shut power off when the task requires it, and verify de-energization with an appropriate tester; PPE and safe clearances still matter. Leave electrical work requiring a licensed trade to a licensed electrician. Treating these controls as part of the setup matters because a tool organizer or stabilizer does nothing to reduce the consequences of contact with energized equipment.
Frequently Asked Questions
Which ladder accessories are most useful for household jobs?
A secure tool tray or organizer often helps with small repair and painting tasks, while an approved stabilizer can help an extension ladder clear a suitable wall feature. A compatible leveler may suit firm ground with a small height difference. Choose based on the task and ladder model, not on how many accessories you can attach.
Do ladder stabilizers make a ladder safer?
A compatible stabilizer can improve contact or provide clearance in certain setups. It cannot compensate for a damaged ladder, unstable ground, a poor angle, overloading, or unsafe climbing. Follow the ladder maker’s instructions and reassess the whole setup before climbing.
Can I use a ladder accessory from another brand?
Use it only if the ladder and accessory manufacturers confirm compatibility. Similar-looking rails and clamps do not prove that the attachment will hold securely. Check the model, attachment points, and load information; contact the manufacturer if the fit is unclear.
Can a ladder leveler be used on a slope?
A manufacturer-approved leveler may help on some uneven ground, but it is not suitable for every slope or surface. The ground must still be firm, and the device must be installed and locked as instructed. Never substitute loose bricks, boards, or scraps for an approved leveling device.
Do accessories affect the ladder’s weight rating?
Accessories can add weight and change how a load is distributed. Count the user, clothing, tools, materials, and accessory contents against the ladder’s duty rating, and follow both manufacturers’ instructions. A full tool bucket can use a meaningful share of the available capacity.
Is it safe to carry tools while climbing a ladder?
Keep your hands free while climbing and maintain three points of contact. Use a belt or hoist method suited to the task, or place tools in a secured organizer once you are positioned as instructed. Do not climb with loose tools that could fall or pull you off balance.
Conclusion
Choose an accessory to solve one clear problem: level a suitable setup, improve approved wall clearance, keep small tools secured, or protect a compatible contact surface. Then check the fit, inspect the hardware, and count every pound against the ladder rating. If the ground, reach, or hazard still makes the setup feel wrong, change the access plan or rent equipment built for that work.
A ladder should feel planted before your boot leaves the ground. If it does not, step back and fix the setup first.